Not many people think of the space under their bed as permanent storage, but it totally can be! This article will show you how to make bed storage drawers and get the most out of every available inch.
As an Amazon Associate, I earn from qualifying purchases.
One of the most overlooked drawer additions that you can add is under the bed! (pun intended) You don’t have to spend a fortune on a fancy new bed with side drawers, either.
With a little effort and time, you can make bed storage drawers yourself. All you need is a bed with some space under it and a few select materials and tools.
Of course, the higher your bed frame sits, the more potential space you have for storage. That said, you can make almost any bed frame height work.
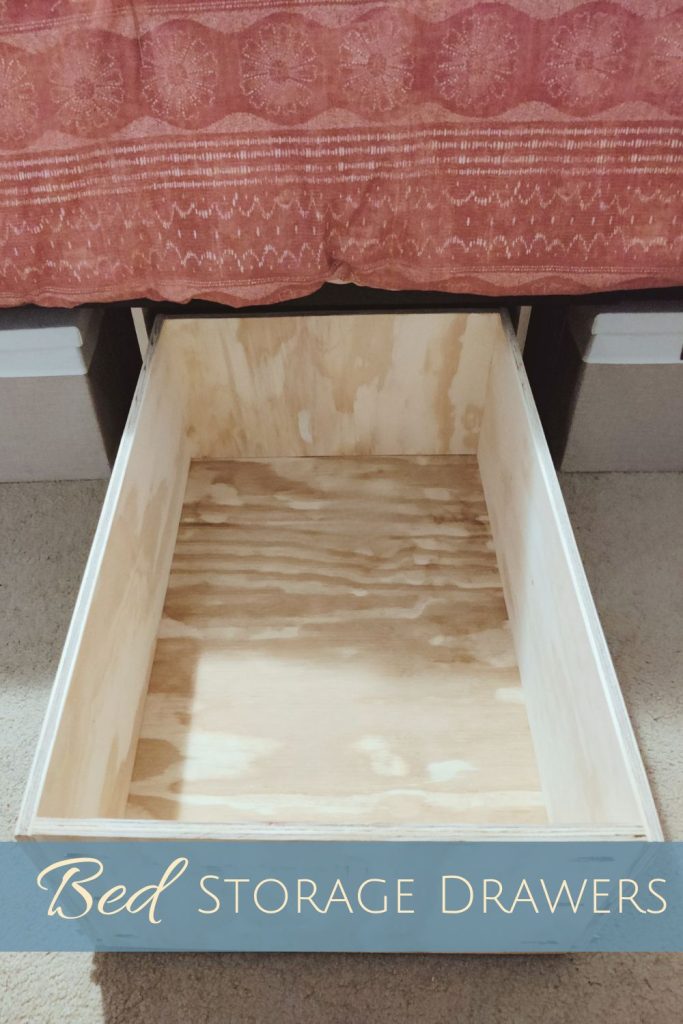
The first time I added these bed storage drawers, I was amazed at the amount of space there was. It gave my wife 3 large drawers for her to fill up with hoodies, shoes, purses, and a ton more!
It was such a relief to be able to add so much storage to a room that seemingly couldn’t hold any more, especially when it was so cheap to do.
That is why I am excited to share this with you! You can gain similar results for your bedroom when you follow this plan.
This article explains how to make amazing bed storage drawers to upgrade your bedroom space.
Contents
Bed Storage Drawers
Creating The Concept
In any context, a drawer has two main components:
- An outer box that holds the drawer (called the carcass, body, box, cabinet, etc, we’ll call it the cabinet)
- The drawer itself
Many drawers can fit into a single cabinet but a single drawer only needs one cabinet to support it. Simple, right?

These drawers are especially simple because they are designed to use only 1 cabinet and 1 drawer. This allows them to be created using only 2 boards and a panel.
It also allows them to be modular; able to be moved around easily or swapped out for another drawer. This is preferable to other drawer designs that are big, bulky, and hard to move.
You also have the option to connect multiple cabinets if you need them to be one unit.
Honestly, these bed storage drawers are great and will provide super easy access to ample storage under your bed!
Bed Height
Before we start making the drawer, we need to know how tall to make it so it will fit under the bed. This is done by measuring the distance between the floor and the bottom of the bed frame.
In addition, make sure nothing is sticking out that would limit the height of the drawer. This includes things like bump-outs, screws, supports, etc.
Similarly, ensure that there is at least 26″ of clearance from the side of the bed frame to the middle. We will need the drawer to be able to tuck under the bed far enough that it doesn’t stick out.
For this project, we will use the height of the bed frame I purchased to give as much under bed storage as possible. The bed frame has a whopping 12 1/4″ of space to use under it, it’s fantastic!
Since the under-bed height is 12 1/4″, the height of the drawer cabinet will be 12″. This is enough to fit under the bed frame and have some wiggle room to move it around as needed.
If the space under your bed frame is of a lesser height, you will need to purchase boards thin enough to fit under it.
For example, if your bed frame is only 11 inches off the floor, you will need a 1″ x 10″ and 1″ x 8″ board to compensate. The drawer board width should be about 2″ shorter than the cabinet board width.
Materials
As mentioned, these bed storage drawers are designed to be easily created from only 3 pieces of raw material. You don’t need a table saw and a bunch of intricate cuts to make it.
It also uses full extension drawer slides for easy access to items but you can swap them out for cheaper, partial extension slides if you want.
Shopping List:
- 1″ x 12″ x 8′ Board (x1)
- 1″ x 10″ x 8′ Board (x1)
- 1/4″ x 2′ x 2′ Plywood Panel (x1) OR cut down a 1/4″ x 4′ x 8′ sheet
- #2 x 1″ Coarse Thread Pan Head Screws (Kreg)
- 24″ Full Extention Drawer slides (x1 pair)
- 100 Grit Sand Paper
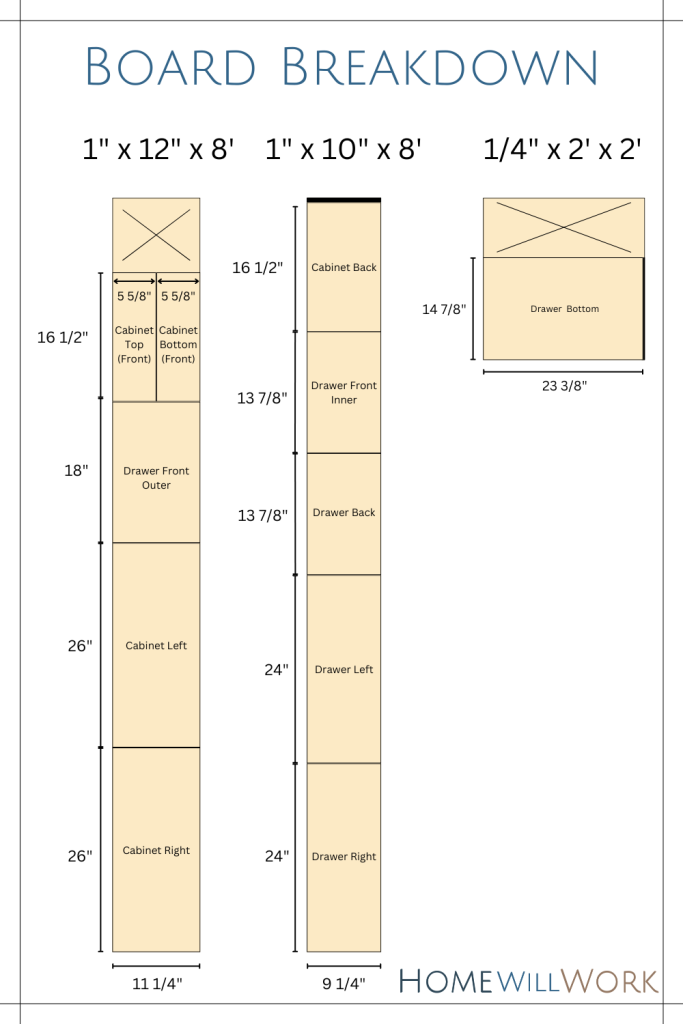
Cut List:
Cabinet
- 1″ x 12″ @ 26″ (x2 for left & right sides)
- 1″ x 12″ @ 16 1/2″ (cut in half the long way to make it x2 for top & bottom)
- 1″ x 10″ @ 16 1/2″ (x1 for back)
Drawer
- 1″ x 12″ @ 18″ (x1 for outer slab front)
- 1″ x 10″ @ 24″ (x2 for left & right sides)
- 1″ x 10″ @ 13 7/8″ (x2 for front & back)
- 1/4″ plywood @ 14 7/8″ x 23 3/8″ (x1 for bottom)
Tools
The design uses the Kreg Pocket Hole Jig system to connect the pieces. It is a great system and is easy to use so I highly recommend it.
At a minimum, you will need a single pocket hole jig but they can be a bit hard to work with.
If you have the funds and are willing to commit, I recommend getting the K4 clamped version. It makes pocket-hole drilling so much quicker and easier!
Additionally, all of the cuts for this design can be done with only a circular saw, T-square, and clamps. The quickest cheap way to cut wood!
Required:
- Carpenter Pencils
- Tape Measure
- T-Square
- 24″ Clamps
- Circular Saw
- Drill
- Drill Bits
- Driver Bits
- Single Pocket-Hole Jig
- Screw Driver
Optional:
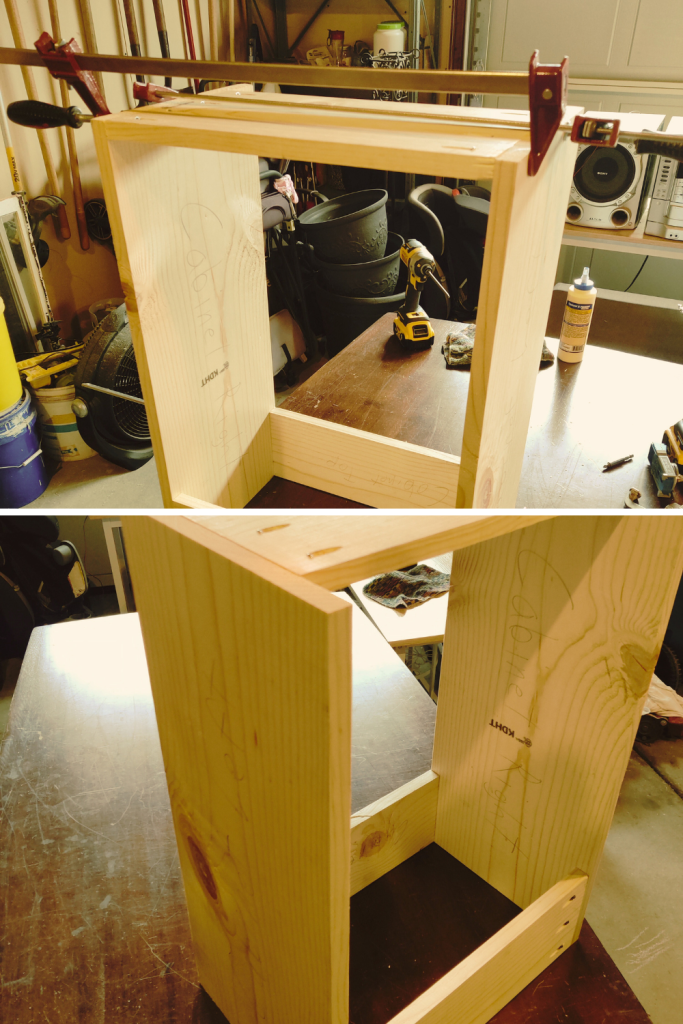
Creating The Cabinet
First, I want to establish that the cabinet is just a box and making a box is not hard. There are no fancy cuts or measurements, we just cut the pieces, drill the holes, and screw the pieces together.
That’s it.
What we should keep in mind is leaving one face of the cabinet open for the drawer. Other than that, it is pretty cut and dry. Let’s get started.
Cut The Pieces
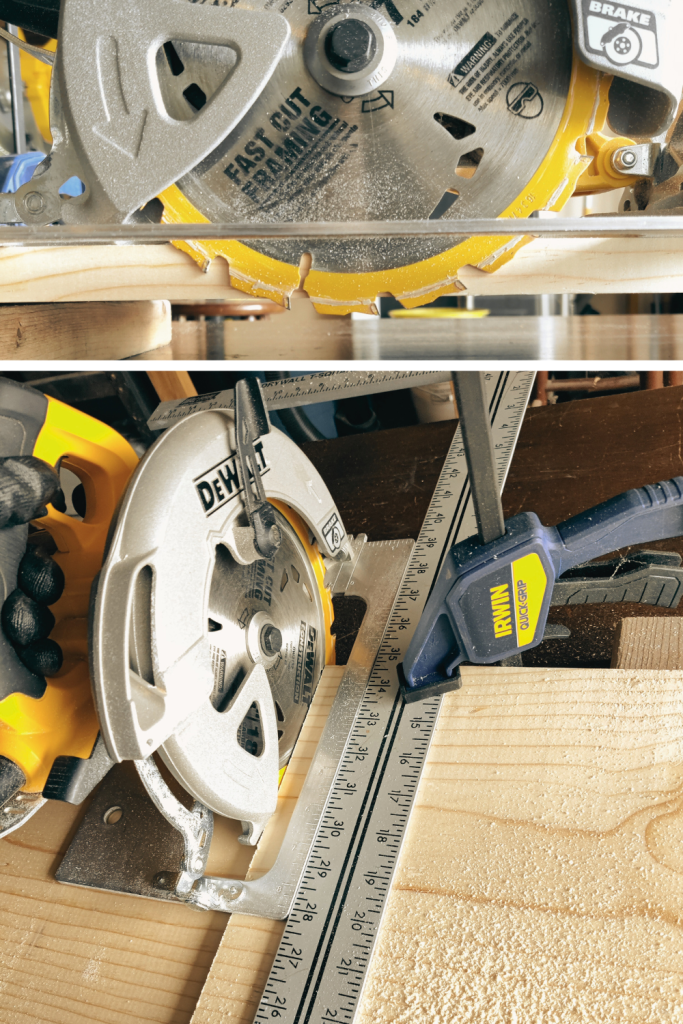
- Cut one edge of each 1” x 12” and 1” x 10” board to make sure we have a square edge (never trust a factory edge).
- Set the circular saw to a minimum depth of 1″.
- Cut the 1” x 12” and 1” x 10” boards into pieces according to the Board Breakdown above, starting from the previously cut edge. Be sure to label each piece accordingly so you can stay organized.
- Set the pieces labeled for the drawer aside, we’ll make the drawer with them later.
Assemble The Front

- Take the Cabinet Top and Cabinet Bottom. On the outside of each piece, drill two pocket holes into the same face at each end. Make sure to drill each hole at least 1″ away from the side edges of the piece.
- Do the same for the Cabinet Back but drill three holes instead.
- On a flat surface, lay out the Cabinet Left, Cabinet Right, and Cabinet Bottom.
- Stand the Cabinet Left and Cabinet Right on-end and clamp the Cabinet Bottom between them on one edge, pocket holes facing outward.
- Align the edge of the Cabinet Bottom with the end of the Cabinet Left and Cabinet Right, flat against the surface. Make sure the clamp is in the middle of the Cabinet Bottom and no pocket holes are covered.
- Take the Cabinet Top and clamp it between the Cabinet Left and Cabinet Right on the same end as the Cabinet Bottom but on the opposite side. The Cabinet Top should run parallel to the Cabinet Bottom.
- Once both sides of the cabinet have been clamped, attach the pieces by driving the 1″ screws into each pocket hole. Make sure the faces of the Cabinet Top and Cabinet Bottom are flush with the edges of the Cabinet Left and Cabinet Right before attaching.
- Remove the clamps after attaching the pieces.
Assemble The Back
- On the outside of the Cabinet Back, drill three pocket holes into the same face at each end. Make sure to drill the outermost holes at least 1″ away from the side edges of the piece.
- Flip the cabinet so it is standing up on the opposite end.
- Take the Cabinet Back and slide it between the Cabinet Left and Cabinet Right ends, pocket holes down.
- Align the Cabinet Back to the same side as the Cabinet Bottom. Make sure the face of the Cabinet Back is flat on the surface.
- Hold the Cabinet Back in place and flip the cabinet on its bottom. Make sure the bottom edge of the Cabinet Back is flat on the surface.
- Clamp the Cabinet back between the Cabinet Left and Cabinet Right. Make sure the clamp is in the middle of the Cabinet Back and no pocket holes are covered.
- Once clamped, attach the pieces by driving the 1″ screws into each pocket hole.
- Remove the clamps after attaching the pieces.
Voilà! We have a cabinet!
Creating The Drawer
Making the drawer is similar to making the cabinet. It is still just a box but the bottom is thin and is slid into cut-out channels on the inside of the drawer box.
This gives it more strength to hold things than if we just zipped it in with screws (which we couldn’t do anyway since it’s so thin).
It may sound scary, but stick with me, it’s not as bad as you think. You’ve come this far, I know you can do this part, too!
Prep The Pieces

- Cut down the 2′ x 2′ sheet for the Drawer Bottom according to the cut list above.
- Take the Drawer Front and Drawer Back. On the outside of each piece, drill three pocket holes into the same face at each end. Make sure to drill the outermost holes at least 1″ away from the side edge of the piece.
- Lay out the pieces of the drawer wall as if you were to assemble them.
- On the inside face of each piece, measure 1/2″ up from the bottom and lightly scribe a horizontal line.
- Repeat the scribe measuring up 3/4″ from the bottom of each piece. The space inside the scribed lines is where the channel goes.
- Adjust the circular saw to a 3/4″ depth and cut out the channel between the scribed lines.
- Make 3 passes on the top, middle, and bottom of the channel with the circular saw and clean out the rest with a flathead screwdriver or 1/4″ chisel.
- Test the channel size by passing the Drawer Bottom through the channel of each piece. Make extra passes with the circular saw if the Drawer Bottom doesn’t fit.
- Once all the channels are cut, use 100 to 150 grit sandpaper to round off the top edges of the Drawer Left, Right, Front, and Back. Also smooth any exposed faces, including the inside of the drawer and the left and right outsides.
Assemble The Drawer
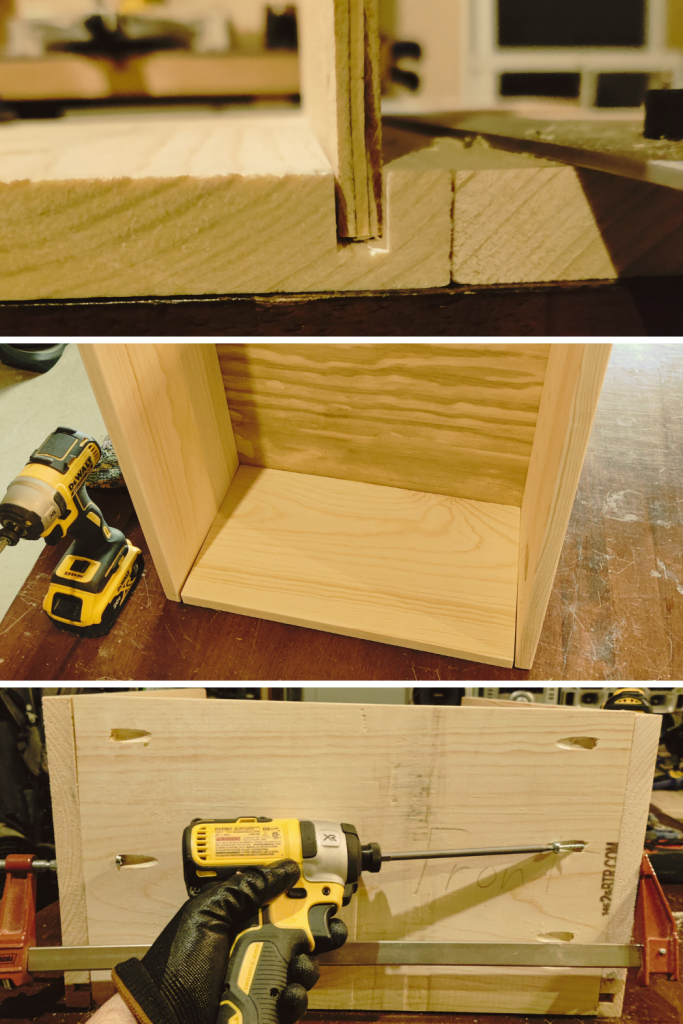
- Lay out the Drawer Left and Drawer Right on a flat surface, with bottom edges down and channels facing each other.
- Slide the Drawer Front between the Drawer Left and Drawer right, bottom edge down and channel facing inside.
- Align the Drawer Front flush with the edges of the Drawer left and Drawer Right.
- Clamp the pieces together. Make sure the clamp is in the middle of the Drawer Front and no pocket holes are covered.
- Once clamped, attach the pieces by driving the 1″ screws into each pocket hole.
- Flip the drawer vertically so the Drawer Front is face-down on the surface.
- From the open side of the drawer, slide the Drawer Bottom into the channels of the Drawer Left and Drawer Right. It should slide down both channels and into the Drawer Front channel.
- If the Drawer Bottom fits, place the channel of the Drawer Back over the exposed end of the Drawer Bottom.
- Alight the Drawer Back flush with the Drawer Left and Drawer Right and clamp as before.
- Once clamped, attach the pieces by driving the 1″ screws into each pocket hole.
- Remove the clamps after attaching the pieces.
Drawer complete!
Creating Bed Storage Drawers
We have a cabinet and we have a drawer. Time to put them together!
It is important to pay attention to the spacing during this part, there is not a lot of margin for error.
Nevertheless, you’re so close to completing your new bed storage drawers so don’t quit now. You’ve got this!
Attach The Drawer Slide Front

- Open the drawer slide package and remove the slides.
- Separate the front slide from the back slide per the drawer slide instructions.
- Flip the drawer left-side-down.
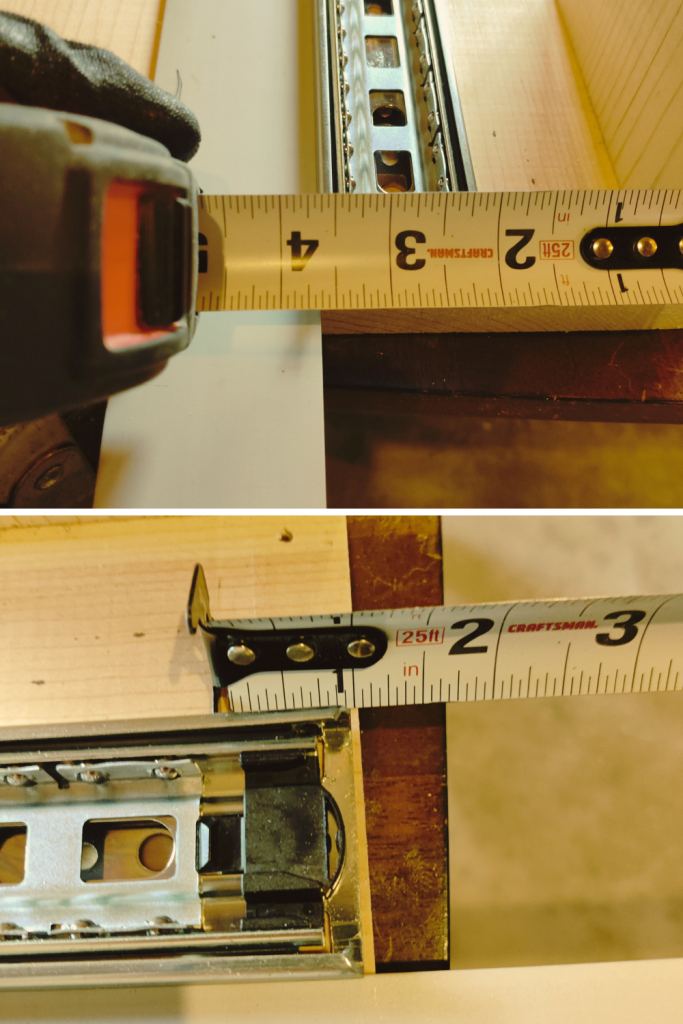
- On the outer right side, measure 2 1/2″ up from the drawer bottom and make a mark near the front of the drawer.
- Repeat for the back of the drawer.
- Use the T-Square as a straight edge and scribe a line between the two marks. This is where the center of the slide front will be.
- Place the slide front on the scribed line and align the screw holes with it. Make sure the slide front is flush with the front of the drawer.
- Holding the slide front in place, drill 3/16″ pilot holes 1/4″ deep on 3-4 of the screw holes. Drive the included screws into the pilot holes with a hand screwdriver.
- Flip the drawer right-side-down and repeat steps 4-8 for the outer left side of the drawer.
Attach The Drawer Slide Back
- Flip the cabinet left-side-down.
- On the inner left side, measure 3 5/8″ up from the inner bottom and make a mark near the front of the cabinet.
- Repeat for the back of the cabinet.
- Use the T-Square as a straight edge and scribe a line between the two marks. This is where the TOP of the slide back will be.
- Place the slide back on the scribed line and match the top of the slide with the line. Make sure the slide front is about 1/16″ behind the front of the cabinet.
- Holding the slide back in place, drill 3/16″ pilot holes 1/4″ deep on 4 of the screw holes. Drive the included screws into the pilot holes with a hand screwdriver.
- Flip the cabinet right-side-down and repeat steps 2-6 for the left side of the drawer.
Assemble The Bed Storage Drawers
Now we’re ready to put it all together! Pull out each slide back from the cabinet as far as it will go. Then insert each slide front into the corresponding slide back and push the drawer into the cabinet.
You may have to push hard the first time to get the slides to engage. After that, it should be a breeze!

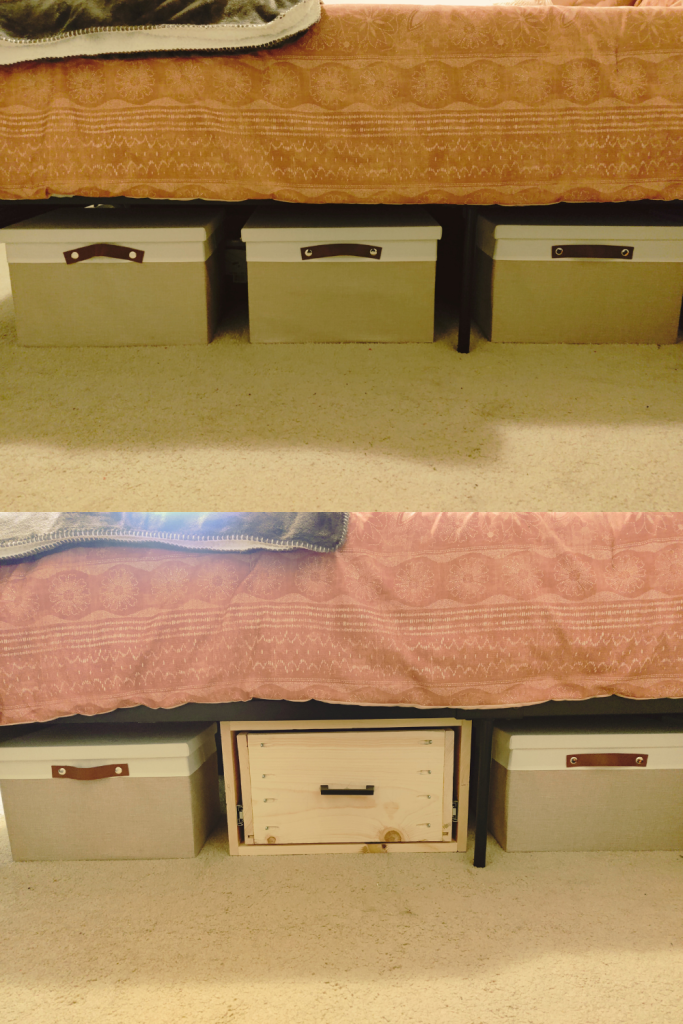
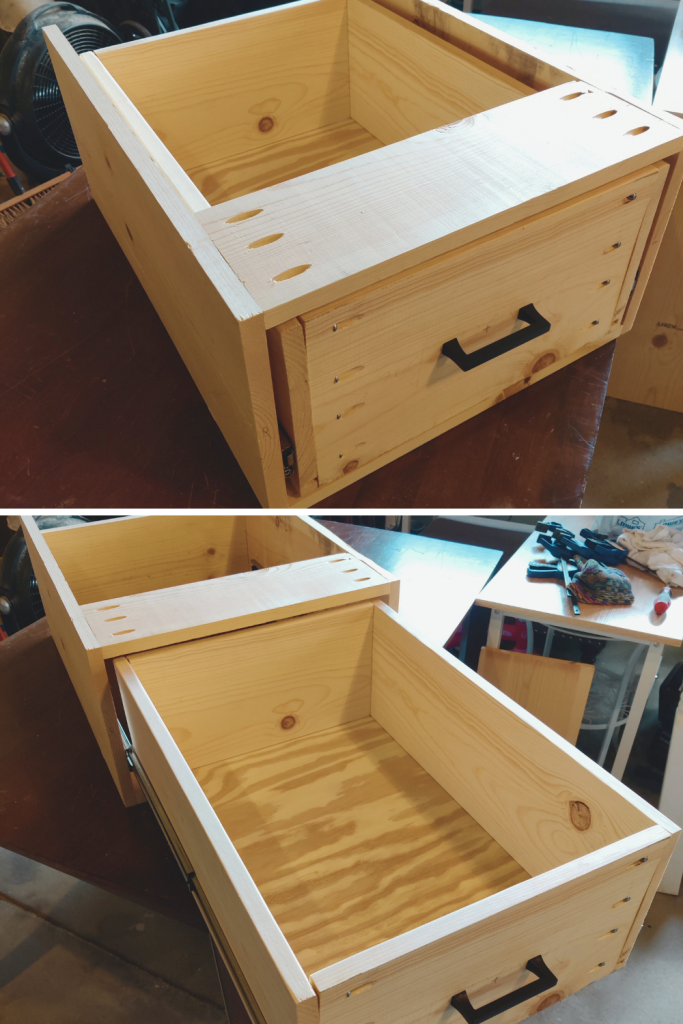
Once your bed storage drawers are built and working, there is only one piece left… The Outer Drawer Front.
You can sand, paint, stain, or finish it however you’d like to suit your needs. Also, consider adding a handle to it for easier drawer operation.
Once you’re ready to attach it, drill two pilot holes through the Inner Drawer Front and about 1/2″ into the Outer Drawer Front.
Then align the holes and attach the pieces with two 1 1/4″ pan head wood screws. Make sure the Outer Drawer Front is squared up with the cabinet before drilling any holes.
Conclusion
I absolutely love these bed storage drawers and so does my wife! They make it easy to access storage, hold a ton of stuff, and help us use almost all the space under the bed.
In addition, they are easy to make, and pretty cheap, too. I also like that you can customize the finish however you want.
If you are in the market for under bed storage, these bed storage drawers are an attractive and affordable option.
I’m confident that once you add these bed storage drawers, you’ll never need another under bed storage solution again. Your home will work much better, too!
Will you try making these bed storage drawers?
Let us know in the comments below!


0 Comments