Home storage space is extremely valuable so the more you can create the better. This DIY wall storage can help you utilize way more space and boost your home’s storage capacity to its max!
As an Amazon Associate, I earn from qualifying purchases.
Using basic principles of economics we can see that low supply with high demand puts a high price tag on storage space. That is why it’s such a wonderful thing to be able to create more of it!
It doesn’t matter how big or small your home is, no one ever seems to say “I just have too much storage. *sigh*” More storage is always better, at least that is the case in my home.
Yes, it is good to do some purging along the way so you don’t become a hoarder but that is a slightly different topic.
In general, if you manage your storage appropriately you can get real benefits from adding more storage to your home.
There are many ways to do that but I found that this DIY wall storage really helps to open up the room while also adding more storage. The key is to look up.
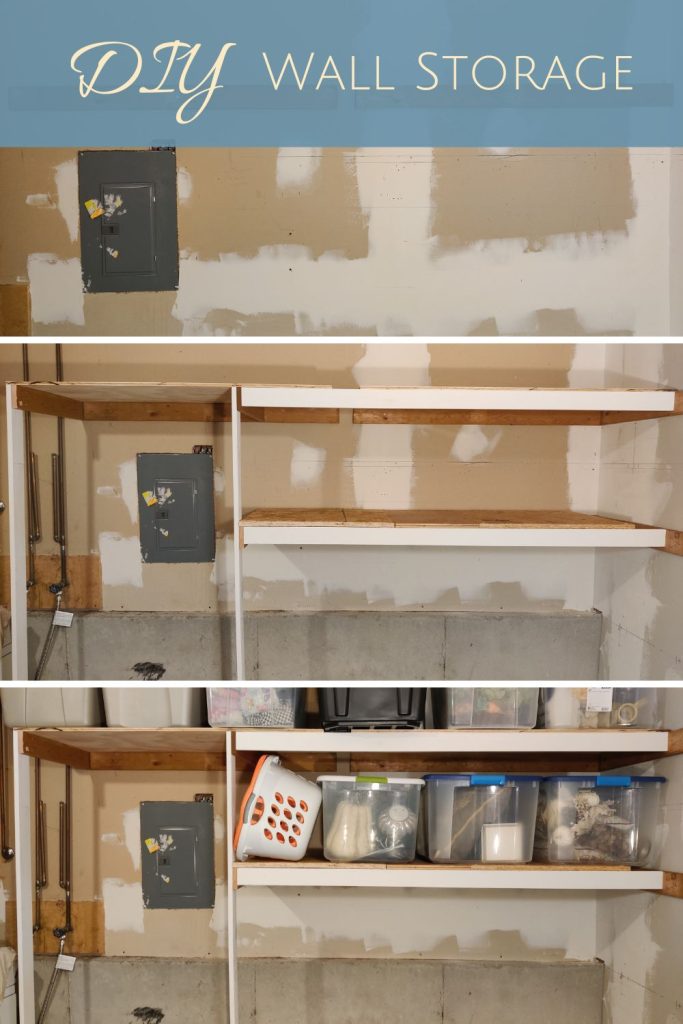
This post covers how to build DIY wall storage and convert unused space into storage.
Contents
The Best DIY Wall Storage
Wall Mounted Storage Ideas
I am a huge fan of creating more storage at home. Some of the most useful shelves in my house are DIY wall storage and I use them daily.
One of the best wall mounted storage ideas I have found leverages walls as part of the shelf itself. Every home has walls (I hope) so they are a great resource to use in your shelf design.
By using a wall as one side of the shelf’s support you can boost its load capacity.
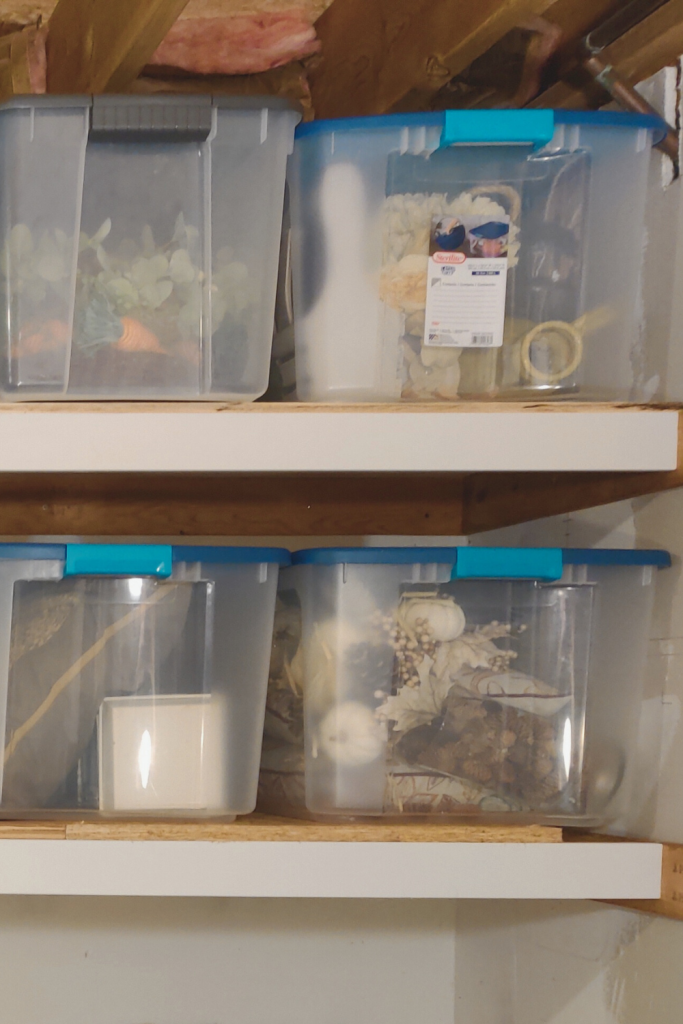
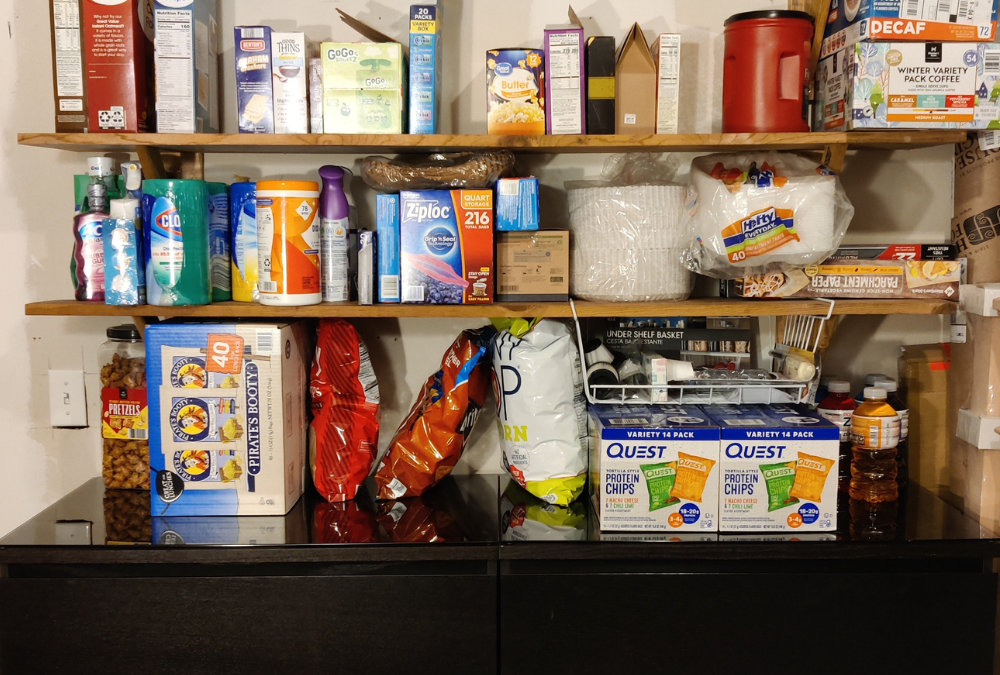
This allows it to be able to hold more weight which equates to holding more things or holding heavier things. It’s the perfect place to store items like totes, seasonal decor, bulk groceries, and the like.
In addition to holding more per shelf, DIY wall storage allows you to add shelving up to the ceiling. Being able to convert high spaces into storage can increase the overall efficiency of your home.
It can also make a storage area feel more open when storage is above eye level. This, in turn, frees up space on the floor for other things that may need a home.
Inexpensive Storage Shelving
Another valuable aspect of DIY wall storage is the ability to get materials on the cheap. Walls are, by nature, a cheap option since they are already available and set up.
If you don’t mind adding holes to a wall, it is a great way to reduce material costs while gaining the benefits mentioned earlier.
You may also be able to use the scrap wood you have to attach the shelf to the wall. Financially, this beats buying new boards for every piece of the project.
While we are on the subject, you can also use scraps to make the shelf itself.
Buying new wood panel products can cost a pretty penny so be sure you need it before you buy. If you don’t mind the look of scrap wood, it can work great for your wall and your wallet.
![]() TIP: To take the savings even further, you could use the screws you already have to fasten the structure. Be cautious with this one since the kind of screw used could impact the strength of the shelving.
TIP: To take the savings even further, you could use the screws you already have to fasten the structure. Be cautious with this one since the kind of screw used could impact the strength of the shelving.
A weak shelf can be dangerous, especially when it is overhead. Be sure the screws are thick enough to hold and try to use a minimum of 2 per attachment.
How To Build A Shelf Unit
Now for the fun part, building the shelf! I am using the plans for the DIY wall storage I built in my storage room. Feel free to adjust it to fit your needs, budget, and available materials.
Tools
There are many options for tools out there and you could spend a fortune getting them all. However, money is a finite resource so we can’t just go out and get everything (Unless you have the money to. In that case, email me, and let’s be friends!).
The focus here is to get the best quality outcome for the lowest cost.
I’ve listed some tools that you will need for the build and some that will make it easier but aren’t necessary.
Required:
Optional:
Materials:
For this project, I could use leftover wood from previous projects. If you have that option, I highly recommend it.
It’s a great way to save some money and free up even more space in your home.
If you don’t have project wood to spare, that is okay, too. You’ll have to buy the needed materials but they will be fresh and probably make your shelf look better than scrap wood.
As a disclaimer, my project required me to work around the breaker access panel. My area legally requires me to leave open at least 15″ from the panel’s center in either direction and 6′ 6″ from the floor up.
Make sure you check with your area’s building and residential codes to make your build legal.
In addition, since my DIY wall storage was built in a corner I could use the other wall as the right-side support. You may not have that option so I will list materials for the case where only the back wall is available to use.
This unit will only have 2 shelves as built. Be sure to purchase more material if you want to add more.
Shopping List:
- 1″ x 3″ x 8′ Furring Strips (x8)
- 1/2″ x 4′ x 8′ OSB (x1) OR 1/2″ x 4′ x 4′ (x2) if you can’t fit an 8-foot board in your vehicle
- #8 x 1 1/4″ Torx Construction Screws
- #9 x 3″ Torx Construction Screws
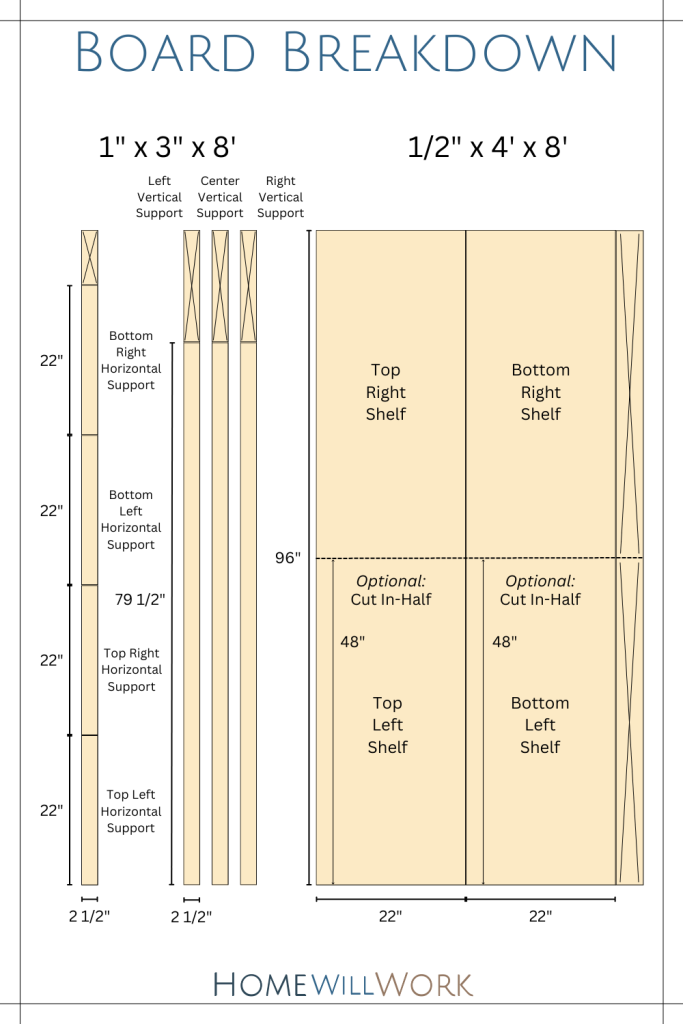
Cut List:
- 1″ x 3″ @ 22″ (x4)
- 1″ x 3″ @ 79 1/2″ (x3)
- 1/2″ x 8′ @ 22″ (x2) OR 1/2″ x 4′ @ 22″ (x4)
Making Simple Storage Shelves
1. Clear the building area
Leave at least 5 feet from where the unit will be assembled, if possible.
2. Decide the height of each shelf
I was building my shelves to store multi-sized totes, the tallest one being over 12″. Adding in a bit of clearance for pipes yielded about 18″. Subtracting 18″ + the 1/2″ of the OSB thickness from the ceiling height yielded 79 1/2″ from the floor. This would be the length of the three vertical supports.
3. Make the cuts
Apply the desired vertical support lengths to the Board Breakdown if desired. Use the Board Breakdown to cut all the pieces in the Cut List.
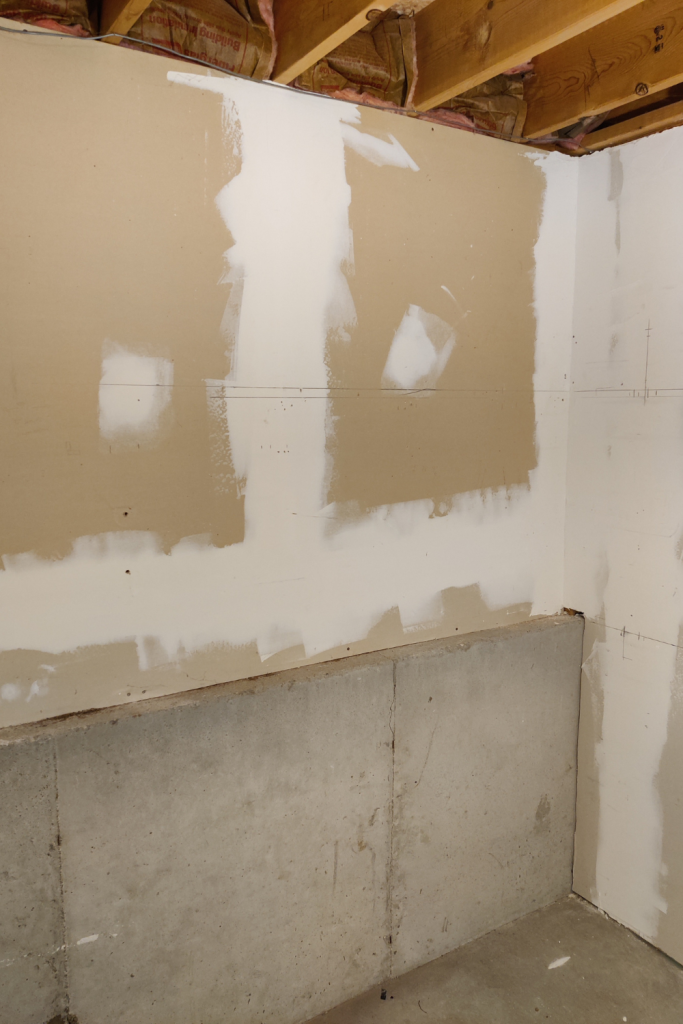
4. Lay out the top shelf position
Using a tape measure and pencil, mark the wall near the unit’s horizontal center for where the bottom of the top shelf will be (18 1/2″ from the ceiling for me).
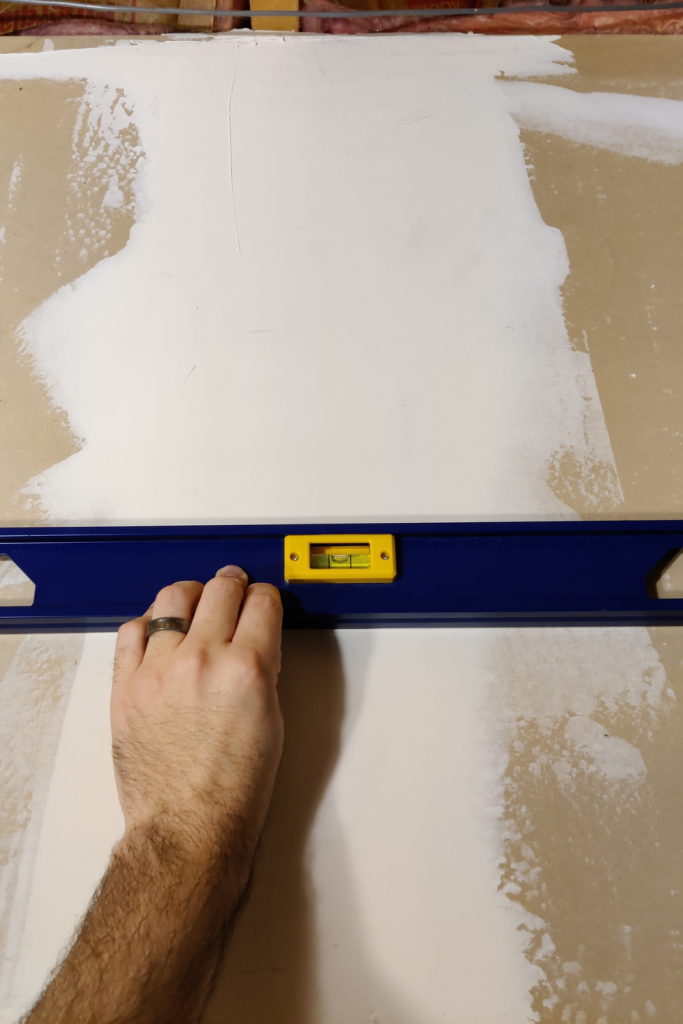
Using a level, match up the straight edge to the mark on the wall and use the level to scribe a horizontal level line on the wall to the left and right of the mark.
![]() TIP: Use a long I-Beam level (72″ or so) to make this part easier.
TIP: Use a long I-Beam level (72″ or so) to make this part easier.
5. Lay out the stud positions
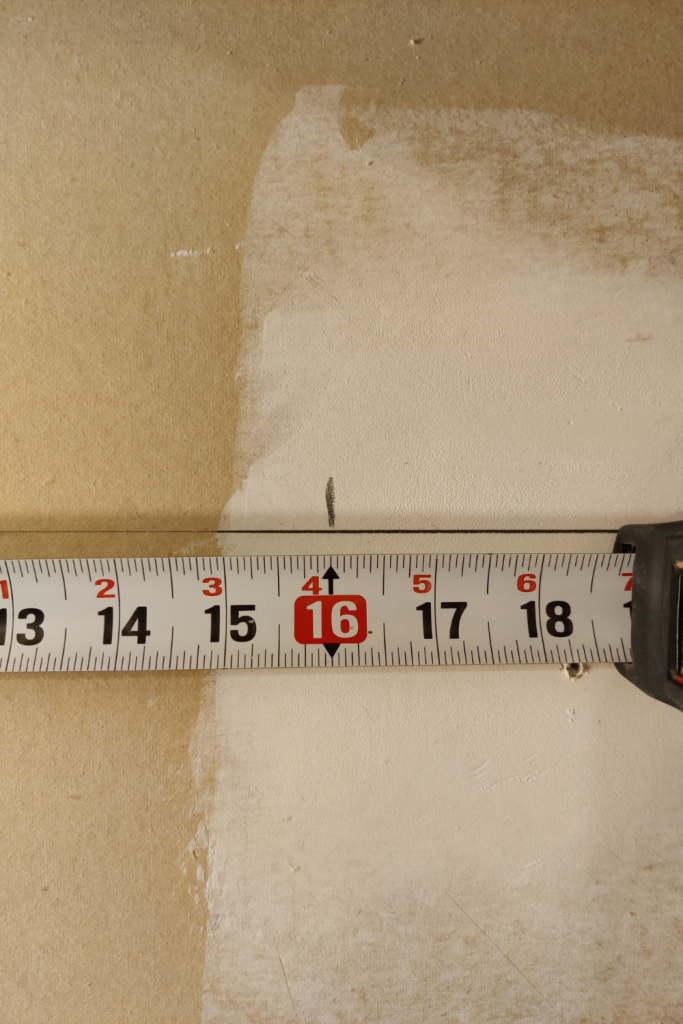
Use your preferred method to find a stud somewhere in the horizontal center of the scribed line and make a mark above the scribed line on the center of the stud using a pencil.
Then use a tape measure to measure 16″ from the mark you just made and make another mark above the scribed line. Do this for the left and right of the first stud mark until all available studs to attach to are marked.
6. Lay out the top shelf wall mount hole positions
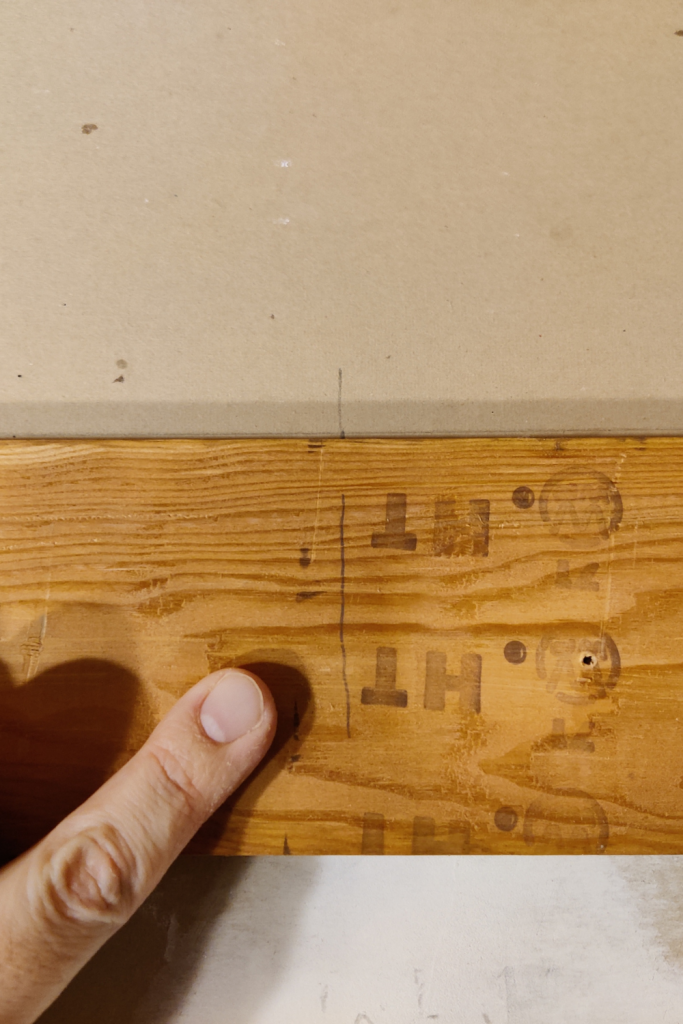
Using 1 of the 1″ x 3″ x 8′ boards, match the straight edge of the board to the horizontal level line and transfer the stud marks on the wall to the board.
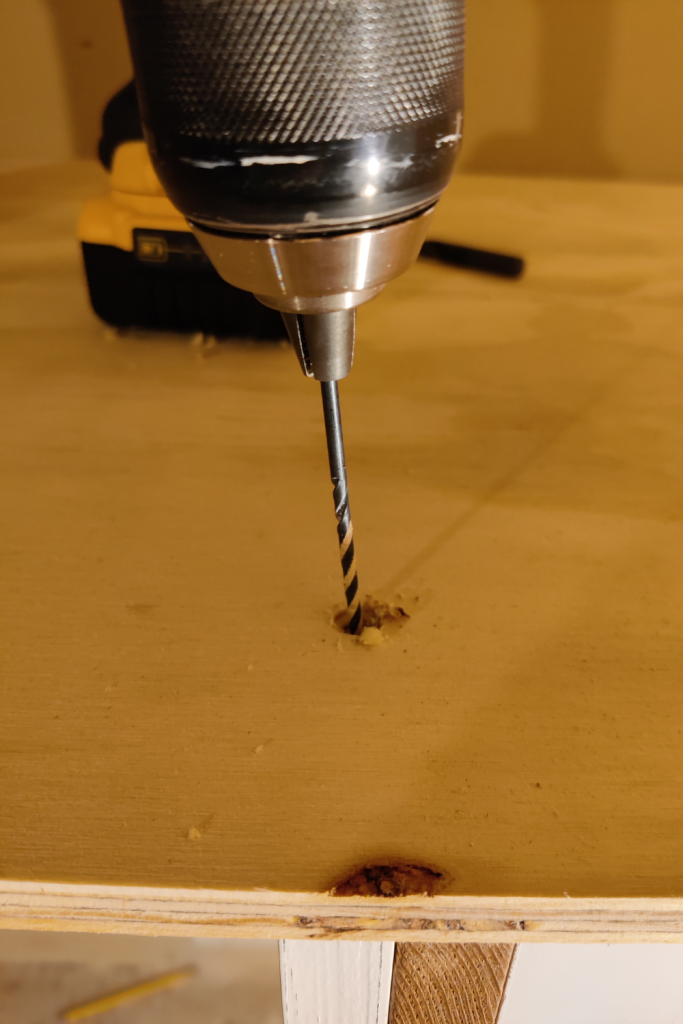
Using a drill with an 11/64″ drill bit attached, drill a pilot hole in the vertical center of the board on each transferred stud mark. Then swap out the 11/64″ drill bit with a 3/8″ drill bit and countersink each drilled hole about 1/8″ deep.
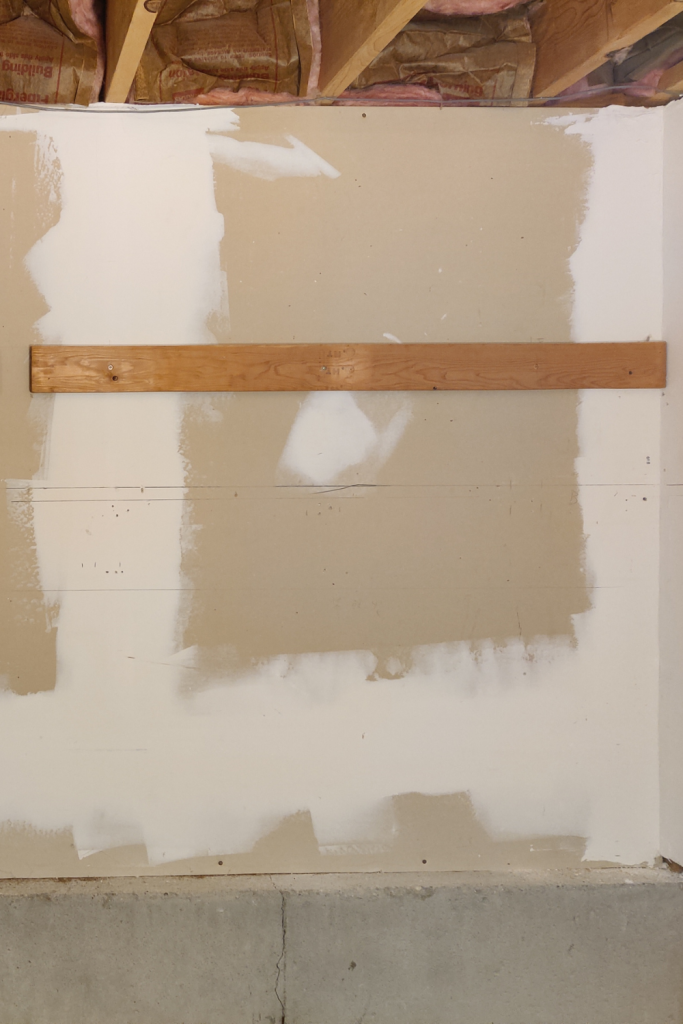
7. Attach the top shelf wall mount
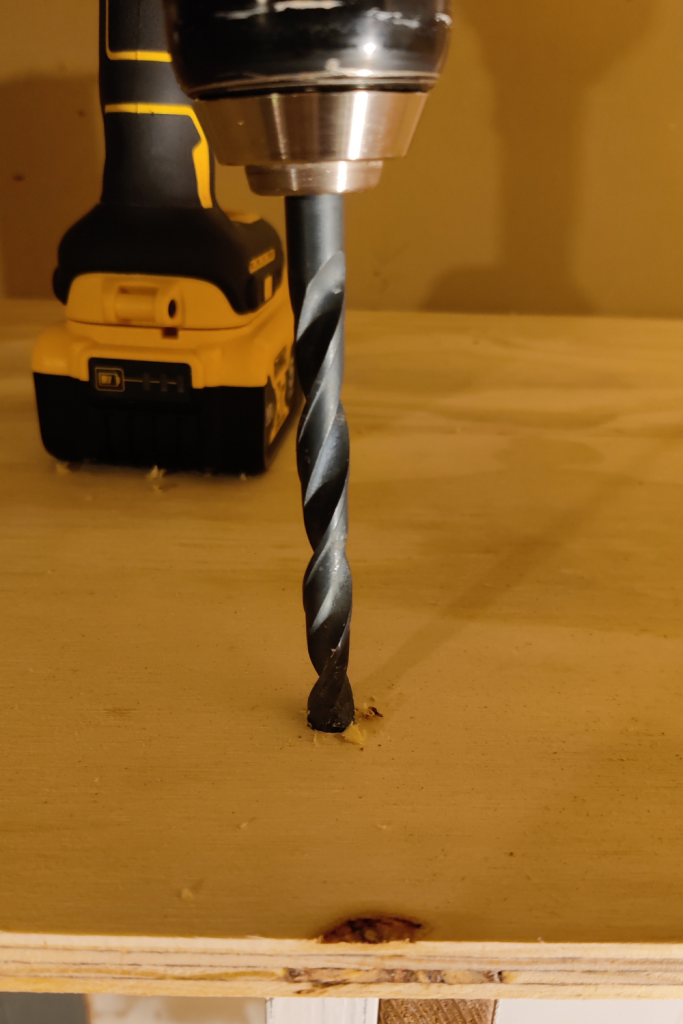
Swap the 11/64″ drill bit back in the drill. Match the board to the scribed line again and drill through two of the holes in the board to make pilot holes the the studs.
Attach a T-25 torx bit to your drill and set it to the screw setting (or attach it to an impact driver, instead). Attach the board to the wall using 3″ screws in the two places you drilled into the wall.
Repeat the process to drill and attach screws for the remaining studs.
![]() TIP: Use an impact driver for screws and a drill for drilling holes. They are both excellent at their respective jobs and you won’t need to swap out drill bits for screw bits and vice versa.
TIP: Use an impact driver for screws and a drill for drilling holes. They are both excellent at their respective jobs and you won’t need to swap out drill bits for screw bits and vice versa.
8. Lay out the side vertical support hole positions
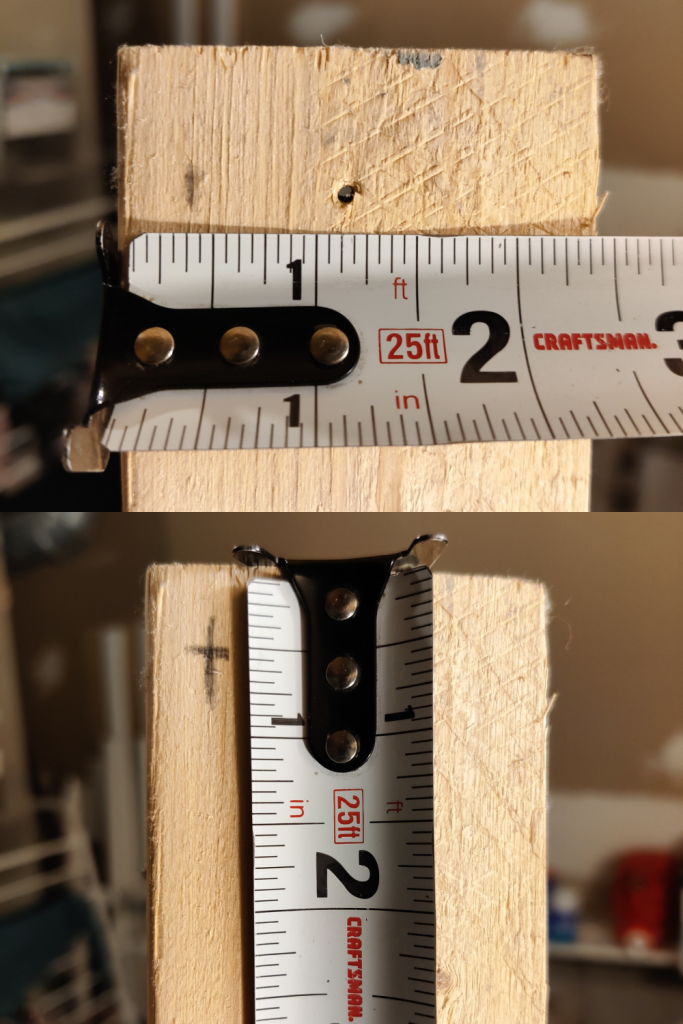
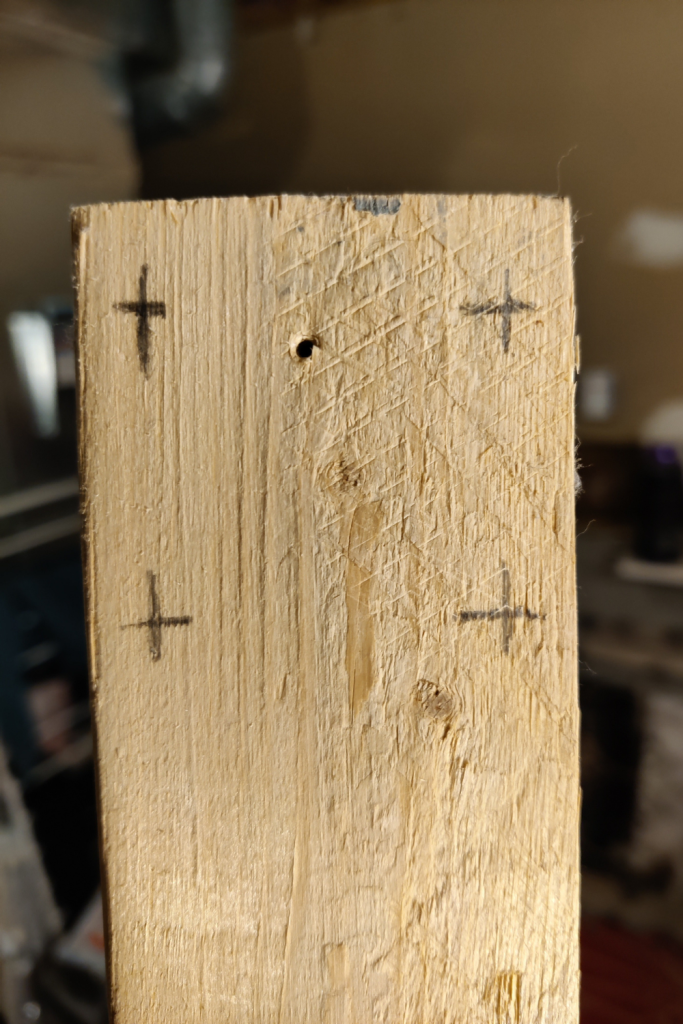
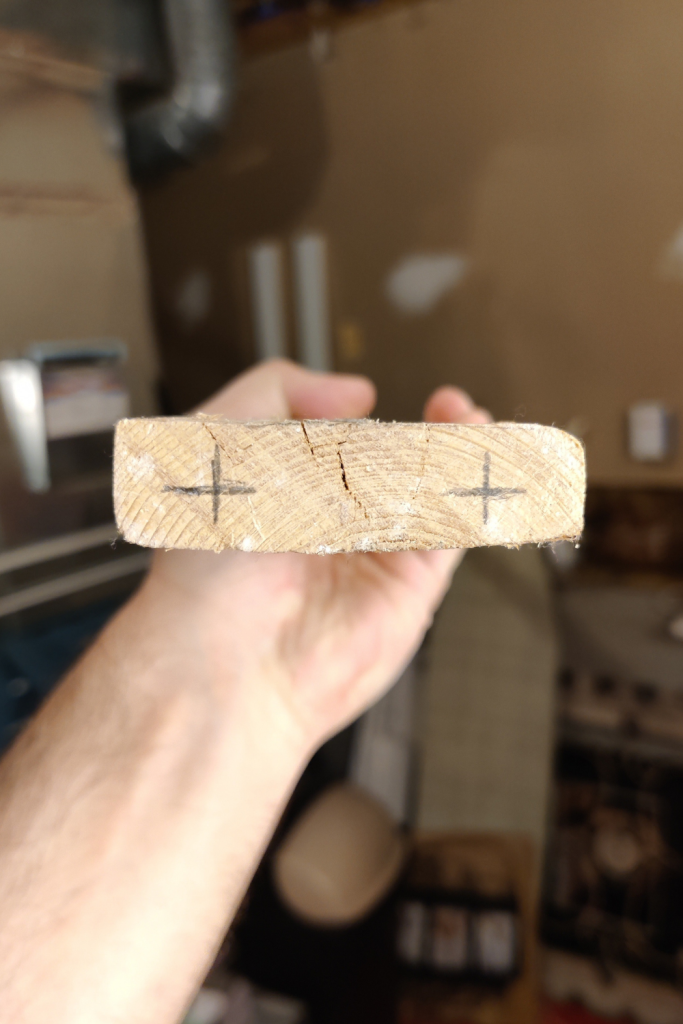
On the face of the left-side vertical support, use a tape measure and pencil to make a hole mark 3/8″ from the left and 1/2″ down from one end. Just under that mark, make another mark the same distance from the left but 2″ down from the same end.
Do the same on the right side of the support, making two marks measuring from the right and down from the end.
Repeat the whole process for the right-side vertical support.
9. Attach the side vertical supports to the horizontal supports
Match the left-side vertical support face (with the marks) to the face of the left-side horizontal support end perpendicularly (so you can see the marks) and hold them together.
![]() TIP: Use clamps to hold the pieces together so you can focus on drilling.
TIP: Use clamps to hold the pieces together so you can focus on drilling.
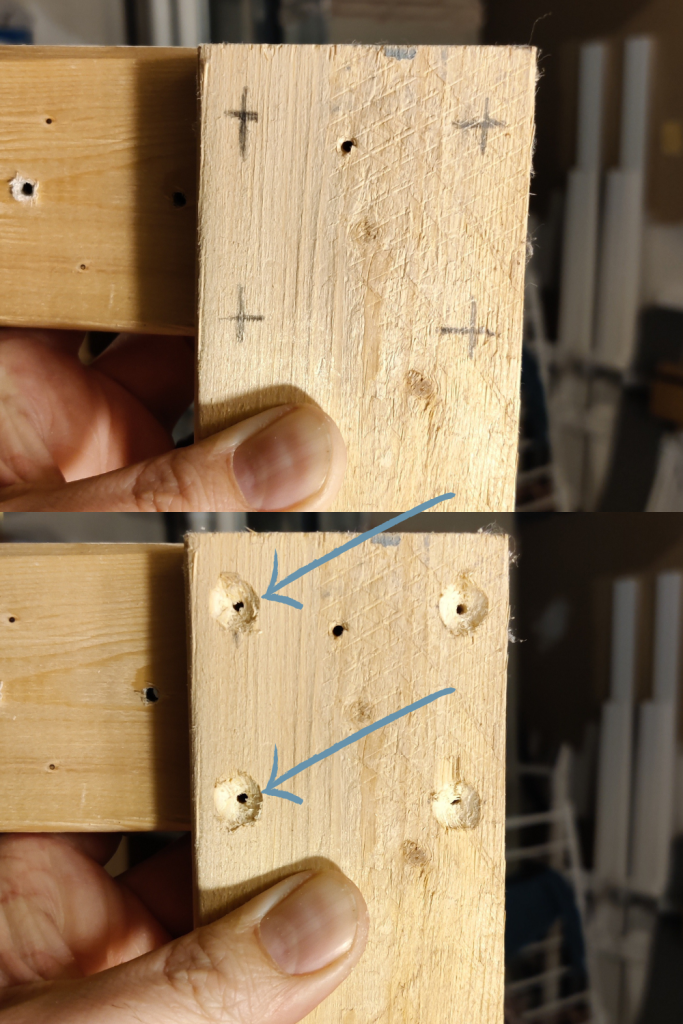
Drill pilot holes and countersinks on each mark as before using a 5/32″ drill bit and a 3/8″ drill bit respectively. Attach the two pieces by driving 1 1/4″ screws through the two holes on the LEFT SIDE ONLY.
The holes on the right side will be used to attach the front horizontal support later.
Repeat the process for the right-side supports, driving the screws through the holes in the RIGHT SIDE of the vertical support.
10. Lay out the front horizontal support hole positions
Using a tape measure and pencil, make two hole marks on the left side end of the front horizontal support.
Make the first mark 3/8″ from the front and 1/2″ from the top. Make the other mark the same distance from the front and 1/2″ from the bottom.
Repeat the process for the right side of the front horizontal support.
11. Attach the front horizontal support to the side supports
Swap the 11/64″ drill bit back in the drill and drill pilot holes on each hole mark of the horizontal support ends.
Match up the left end of the horizontal support against the face end of the left-side horizontal support and hold them together. As before, use clamps for best results.
Attach the pieces by driving 3″ screws through the two open holes on the right side of the left-side vertical support.
If aligned correctly, the screws should pass through the vertical and horizontal supports and into the pilot holes of the front horizontal support.

Repeat the process for the right-side supports, driving the screws through the open holes on the LEFT SIDE of the vertical support.
12. Lay out the side horizontal support hole positions
Using a tape measure and pencil, make two hole marks on the outside face of the left-side horizontal support on the end opposite of the vertical support.
Make the first mark 3/8″ from the end and 1/2″ from the top. Make the other mark the same distance from the end and 1/2″ from the bottom.
Repeat the process for the right-side horizontal support.
13. Attach the side horizontal supports to the wall mount
Place the marked end of left-side horizontal support on the wall against the left-side end of the wall mount and hold them together. As before, use a clamp for best results.
Drill pilot holes and countersinks on each mark as before using a 5/32″ drill bit and a 3/8″ drill bit respectively. Attach the pieces by driving 1 1/4″ screws through the holes in the horizontal support and into the wall mount.

Repeat the process for the right-side horizontal support and the right-side end of the wall mount.
14. Attach the top shelf to the top supports
No need for hole marks this time! Place the top shelf on the top support and position it as squarely as possible.
Every 12 or so inches, drill pilot holes and countersinks using a 5/32″ drill bit and a 3/8″ drill bit, respectively, around the perimeter of the shelf and into the supports it sits on.
Attach the shelf to the supports by driving 1 1/4″ screws into each hole.
15. Build the other shelves and attach center vertical support
Repeat steps 4-14 for the remaining shelves. Once all shelves are complete and attached to the unit you can add the center vertical support.
Using a tape measure and pencil, measure 46 3/4″ from the left end of the top front horizontal support and make a mark.
Hold the face of the center vertical support against the face of the top horizontal support and match the LEFT SIDE of the vertical support to the mark on the horizontal support. User clamps for best results.
Drill at 2 – 4 pilot holes and countersinks where the center vertical support overlaps the top horizontal support using a 5/32″ drill bit and a 3/8″ drill bit respectively.
Loosely attach the center vertical support to the top horizontal support by driving one 1 1/4″ screw into one of the holes.
Once loosely attached, hold a level against the left side of the vertical support and shift it until it is vertically plumb. Once plumb, fully attach the support by driving the remaining screws.
Repeat the drilling and screwing for the remaining shelves.
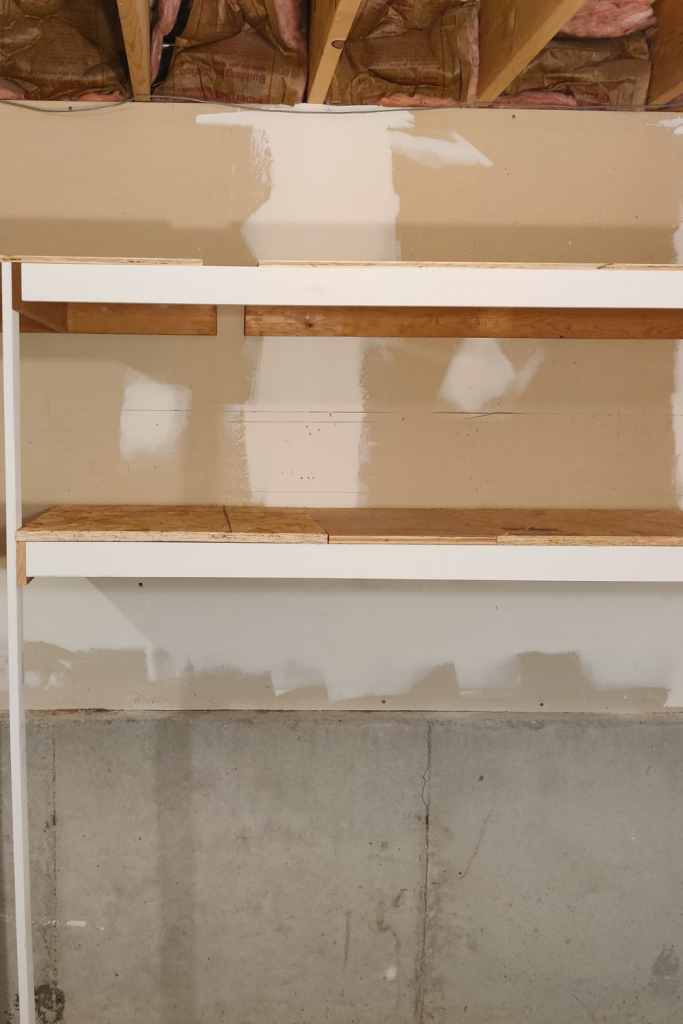
Conclusion
It may take some up-front effort but I believe that converting unused space into DIY wall storage will be worth it. You’ll be able to store more things, have easy access to them, and be able to say that you build it yourself! In the end, your home will work much better.
0 Comments