Updated March 2025: New Video Live Now!
If your home has limited space, you know how precious every inch is. This is especially true with your clothing drawers. That is why it’s important to know how to fold clothes to save space.
As an Amazon Associate, I earn from qualifying purchases.

Clothes are an essential item in your life, plain and simple. You will likely have more than a few of them as well, requiring you to either get rid of some or provide storage for them.
If you opt to keep them all, many people (myself included) turn to dressers and drawers for clothing storage. They provide ease of access to our clothes and can also contribute to the aesthetic of a room.
However, despite the high value of dresser drawers, they can only hold so much.
Learning how to fold clothes to save space can greatly increase the amount you can fit inside those gold mines.
The more clothes that fit, the more clothes you can store, and the fewer clothes that end up on the floor. (Did that rhyme?)
This post covers how to fold clothes to save space using 3 easy and effective techniques.
Contents
How To Fold Clothes To Save Space
Folding Clothes Techniques
If you scour the internet, you are sure to find loads of helpful info on various folding methods.
I am willing to bet that none of them are as well-known as the techniques created by tidying guru Mari Kondo.
For this reason, we’ll start by looking at her method of folding clothes called KonMari.
1. The KonMari Fold
The KonMari method is a general term for Marie’s special way of organizing and storing various kinds of items. Particularly, I have found that her folding methods give you 3 amazing advantages when it comes to drawer storage:
- It keeps clothing items compact
- It provides a clear view of all your items
- It allows for easy storage and retrieval of any item
Applying the KonMari fold to your clothes also allows you to see them better and pick them faster. You can shamelessly leave the drawer open as well since your clothes will automatically look nice.
Now that we’ve covered the advantages of using the KonMari method, let’s look at how you do it.
The basic concept is to fold the item so that it can stand up on end by itself.
The process to get to that point can vary depending on the piece of clothing. Pants are shaped differently than shirts, sweaters are thicker than socks, etc.
![]() TIP: Check out Marie Kondo’s page on how to fold clothes and start practicing.
TIP: Check out Marie Kondo’s page on how to fold clothes and start practicing.
In general, the KonMari method is a fantastic way to fold any item of clothing for storage.
One thing to note, however, is that KonMari requires items to be folded in perfect condition. This means that it takes longer to fold, especially with bigger or more complicated items.
That is why I have adopted my own version of the KonMari method. It applies the same concepts but cuts down on the folding time.
Let’s go over that next.
2. The Kon-“My Way” Fold
I started using the KonMari method of folding my clothes immediately after watching the first episode of her show. It became especially useful since it taught me how to fold clothes to save space, something I desperately needed.
However, the way in which the method is applied requires a large smooth surface to fold on. It also takes quite a bit of time to get every fold perfect.
As much as I appreciate the genius of the KonMari method, life gets busy. Rarely do I have the time to clear a spot on a nice smooth surface to immaculately fold my clothes.
That is why I came up with a way to “KonMari on the fly”. It mixes KonMari techniques with folding methods used in department stores.
This technique combo provides a few additional benefits to those mentioned earlier:
- It requires only a small surface to fold if any at all
- It allows you to stand and fold, increasing mobility during the process
- It cuts down on folding time per item
Being able to fold clothes fast and efficiently while moving can be a huge advantage. Especially when you have lots of laundry!
3. Folding With Dividers
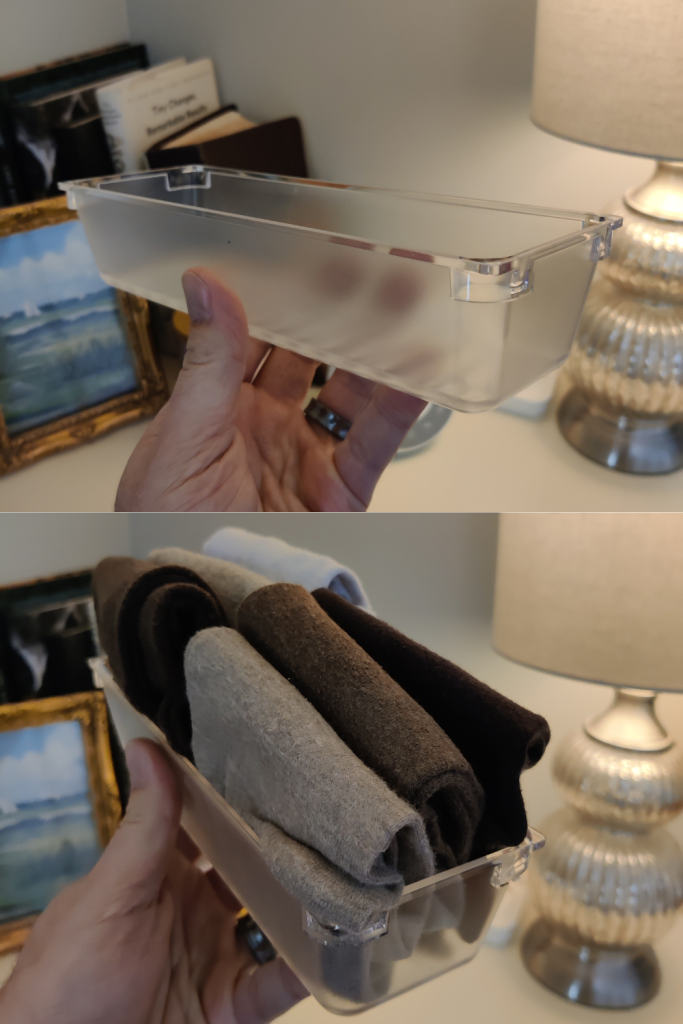
The final folding technique goes hand-in-hand with another space-saving hack. It’s the idea of using dividers in your drawers to store smaller clothing items like socks, underwear, or bras.
Dividing up drawer space allows you to organize small items better and helps to support them when they stand up. This is nice since small clothing items tend to fall over easily due to a lack of material.
You can use small baskets, specially designed drawer dividers, or even cardboard to partition off portions of a drawer.
I used to corral my socks and underwear with cardboard Fairlife milk trays but they’re wearing out.
Now I use this 9-piece Kootek tray set: https://amzn.to/4i4deHw
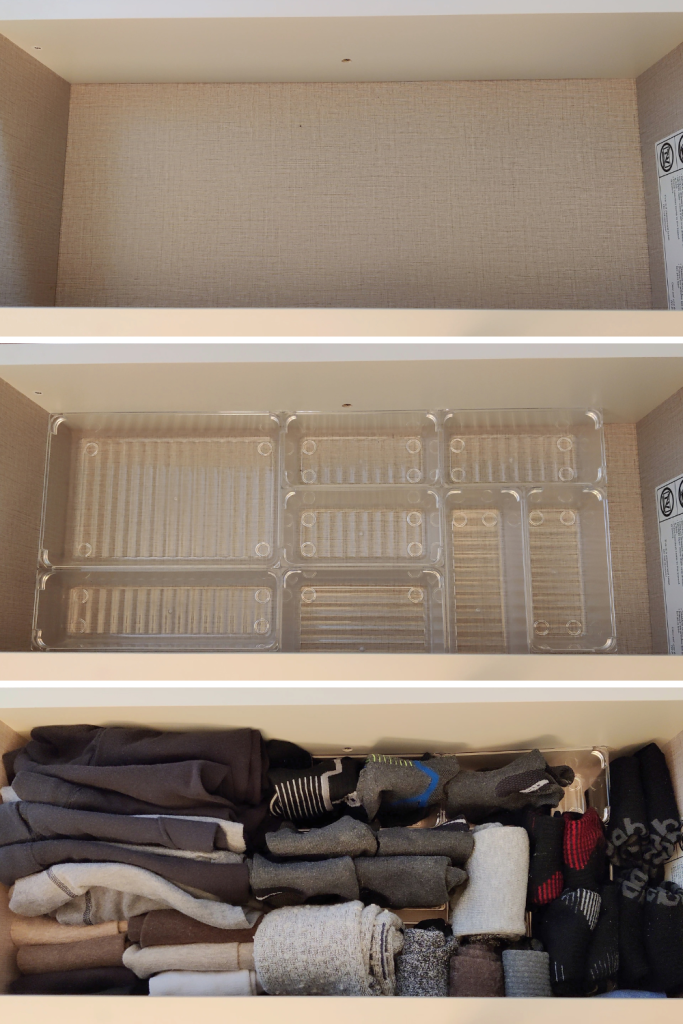

I can Tetris all nine into my 22.5” drawer with a bit of space left over. They’re sturdy, versatile, and keep everything tame, perfect for my smaller drawer.
Measure your drawers and mix what fits, these are my new drawer favorites!
(shout out to the original)
You could stop there and throw in your small items as is, but that wouldn’t be very space-saving, right? This post IS about how to fold clothes to save space, after all.
![]() TIP: It can help to think of each section of divided space as its own little drawer. Folding each item as compact as possible will gain you the maximum amount of storage in each divided space.
TIP: It can help to think of each section of divided space as its own little drawer. Folding each item as compact as possible will gain you the maximum amount of storage in each divided space.
Instead of tossing small items in small “drawers”, fold them in half at least once to help them fit. This cuts down on taken-up space, helps to keep pairs together, and improves the visibility of all your items.
Best Way To Fold Shirts
Now that you are familiar with the methods, let’s start folding some clothes!
From this point on, I will be referencing my augmented KonMari technique most of the time. I believe it gives you the best bang for your buck.
You will probably need a small folding surface when you first start. After some practice, though, you can easily fold most of the clothes using your body.
We’ll go over stand-up folding later in this post.
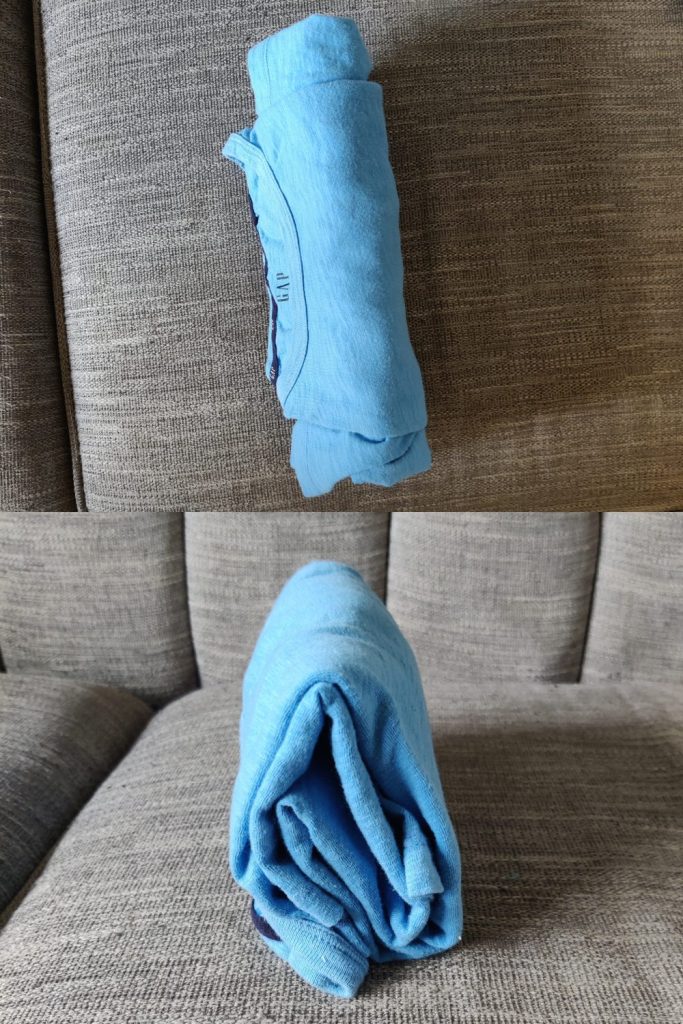
Folding T-Shirts
The good thing about folding T-shirts is that they are pretty thin and have low-material construction. This makes them easy to fold and compress into small spaces.
Here is how to fold a T-Shirt, step by step:
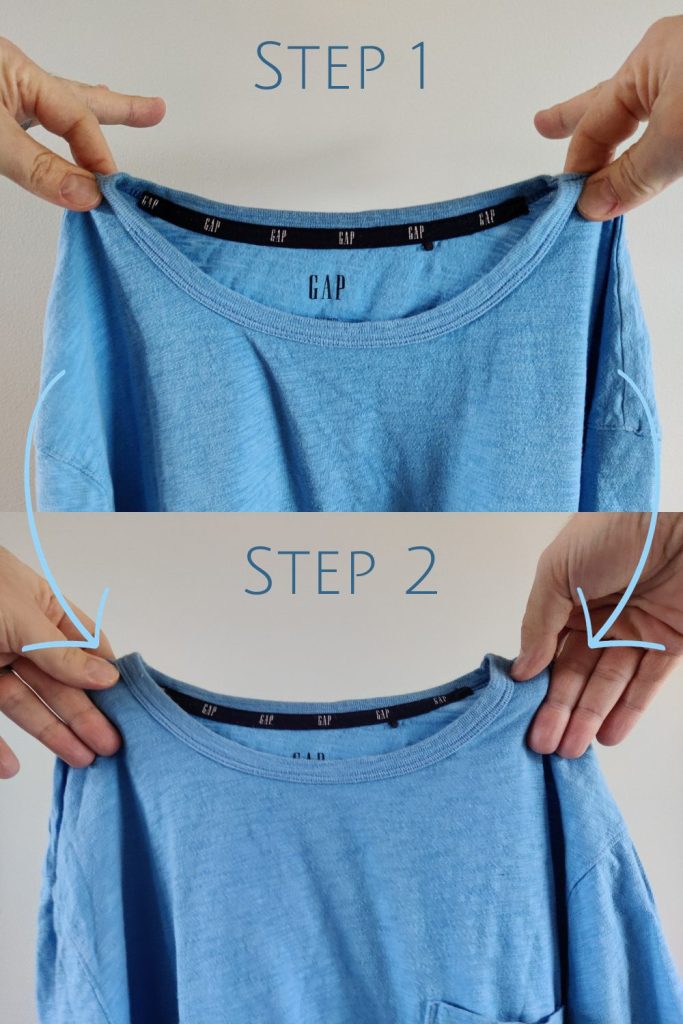

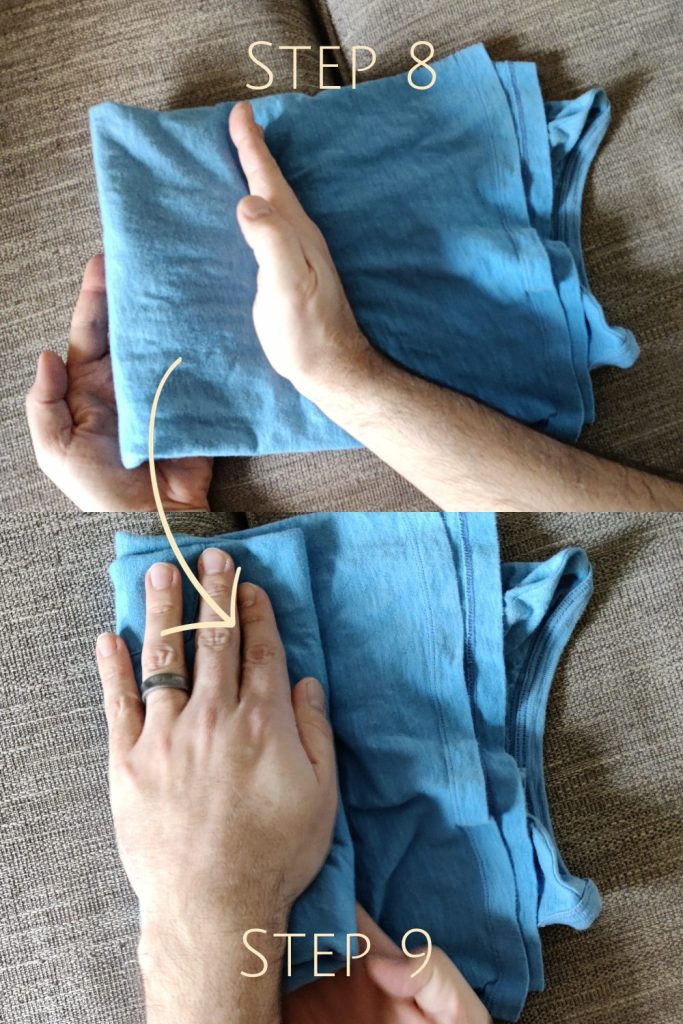
1. Using the index finger and thumb of both hands, pinch the shirt on the shoulder seams where they meet the neck collar.
2. Move the rest of your fingers in front of the shirt
3. Fold one side of the shirt back behind it by pushing the fingers that are in front of the shirt away from you and toward the opposite side of the shirt
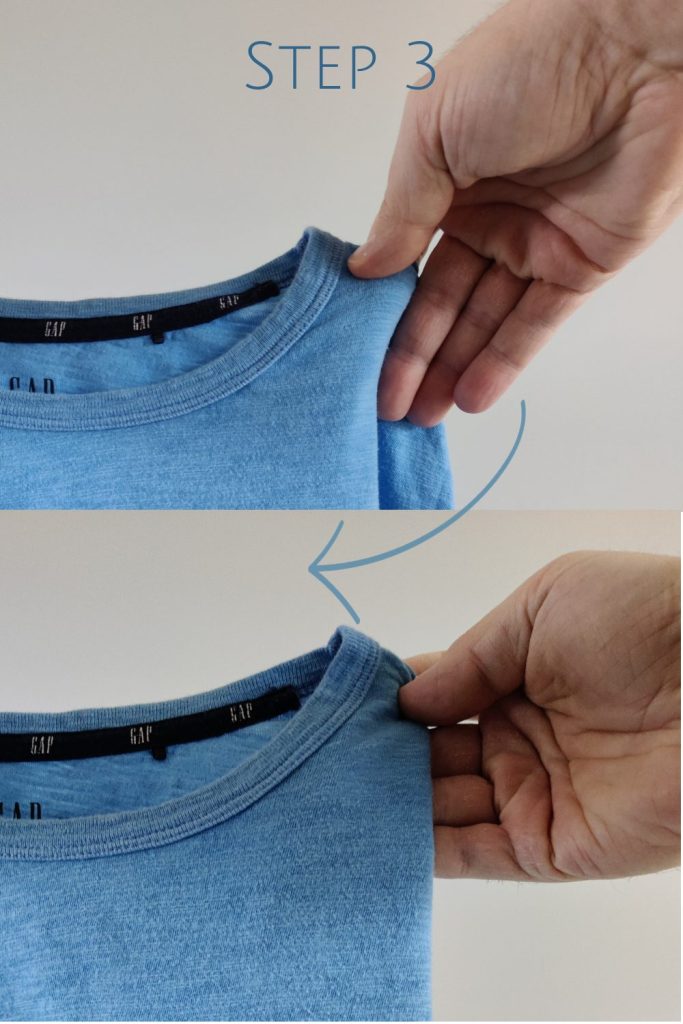
4. Repeat on the other side until you can no longer see the sleeves
5. Keep holding the shirt and lay it front side down on your folding space
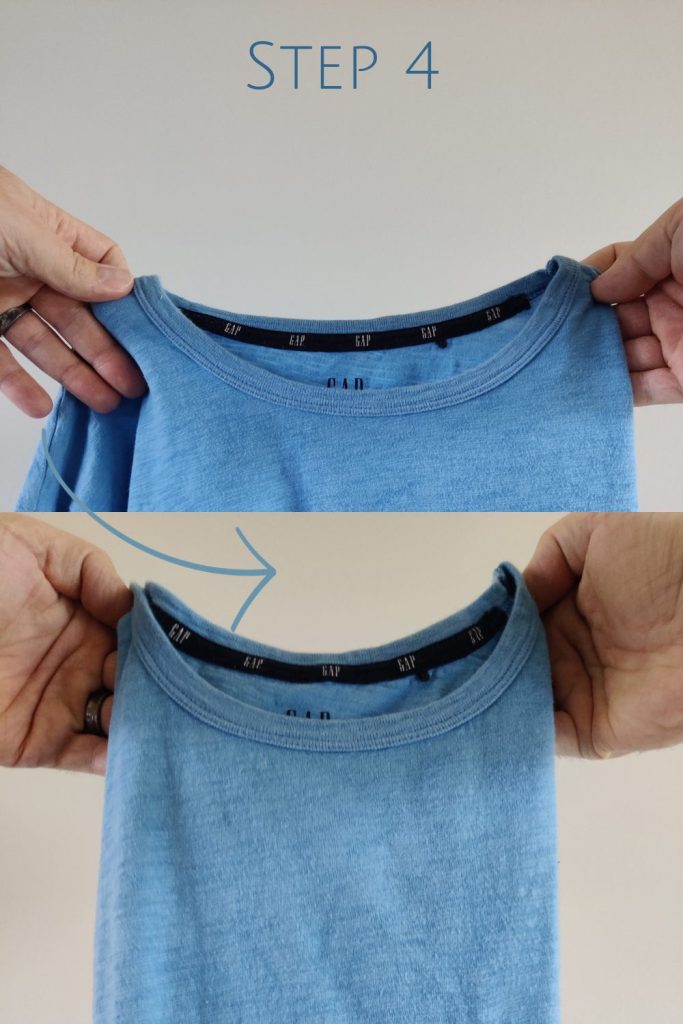
6. Still holding it, fold the shirt in half by folding the neck collar up and away until it meets the bottom of the shirt, then let go
7. Grab the folded shirt at the bottom (opposite the neck collar) and flip it front side down again
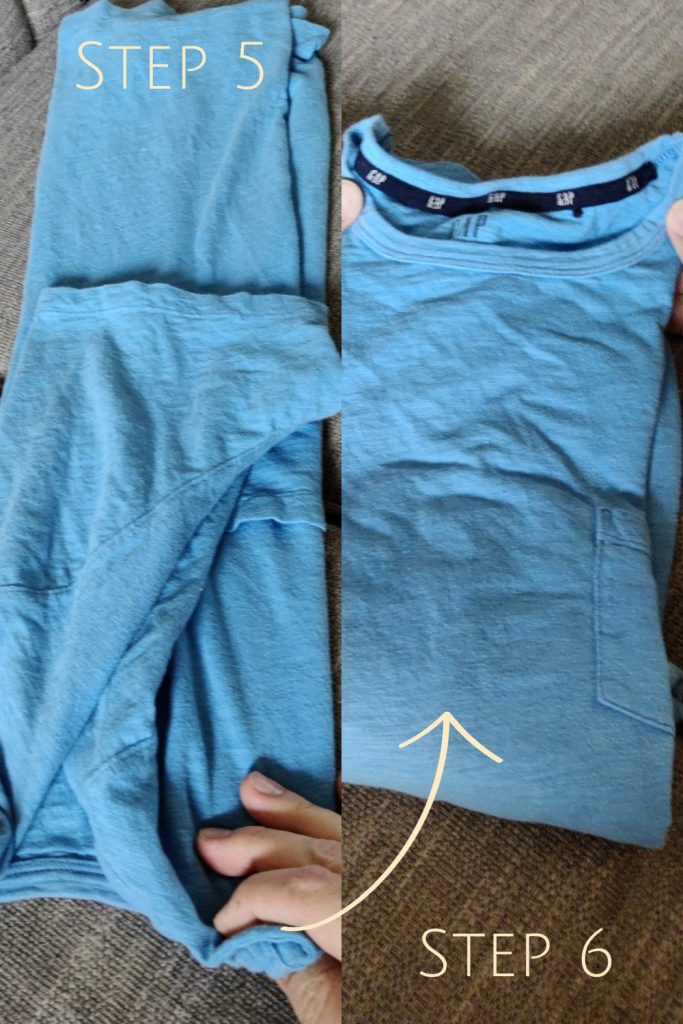
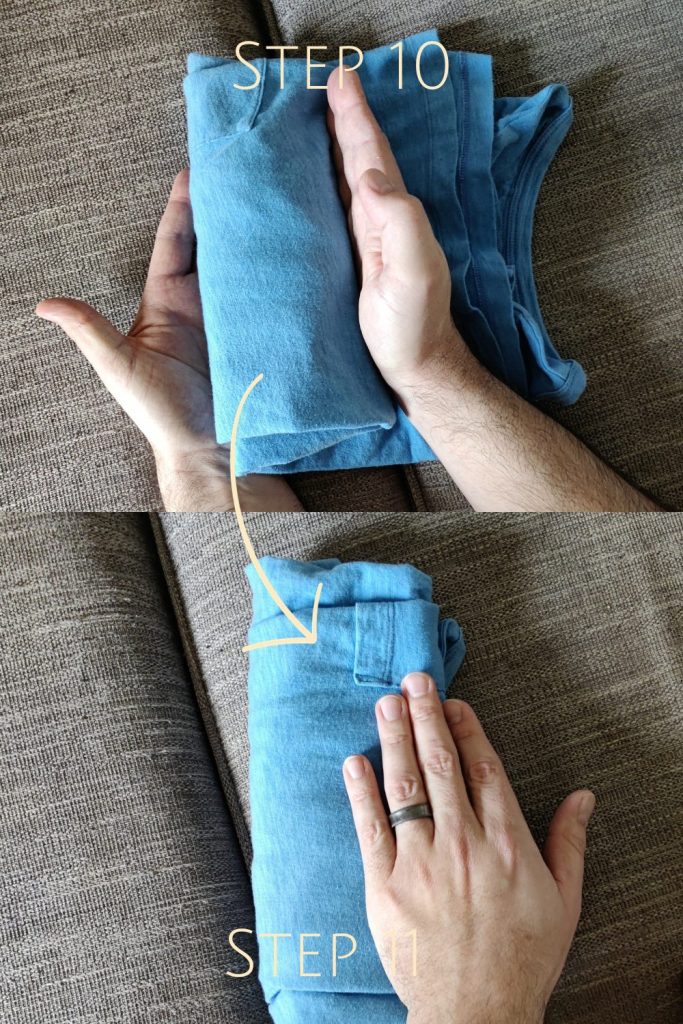
8. From the bottom, place one hand onto the shirt about 1/3 of the way up from the bottom as if you were about to karate chop it (don’t actually karate chop it)
9. Scoot the other hand under the bottom 1/3 of the shirt and fold it into the “chop” hand until it is beneath the fold.
10. Remove your bottom hand and place it in the “chop” position at the end of the folded 1/3 of the shirt.
11. Repeat step 9 to finish folding the shirt
If you fold it correctly, your shirt should be able to stand up on the “open” end. You should also see the neck collar on one side and the middle front of the shirt on the other.
Folding Long-Sleeved Shirts
Folding long-sleeved shirts is essentially the same process as folding T-shirts. The only difference is dealing with the length of the sleeve when you fold the sides of the shirt.
This isn’t a huge deal since it will usually hang down well enough. However, you may have to fold the end of the sleeve if it stretches beyond the bottom of the shirt.
If you’re picky about how the sleeve lays, try the original KonMari method instead. It cuts down on the shirt and sleeve wrinkles, though it takes a bit longer. Trade-offs, right?
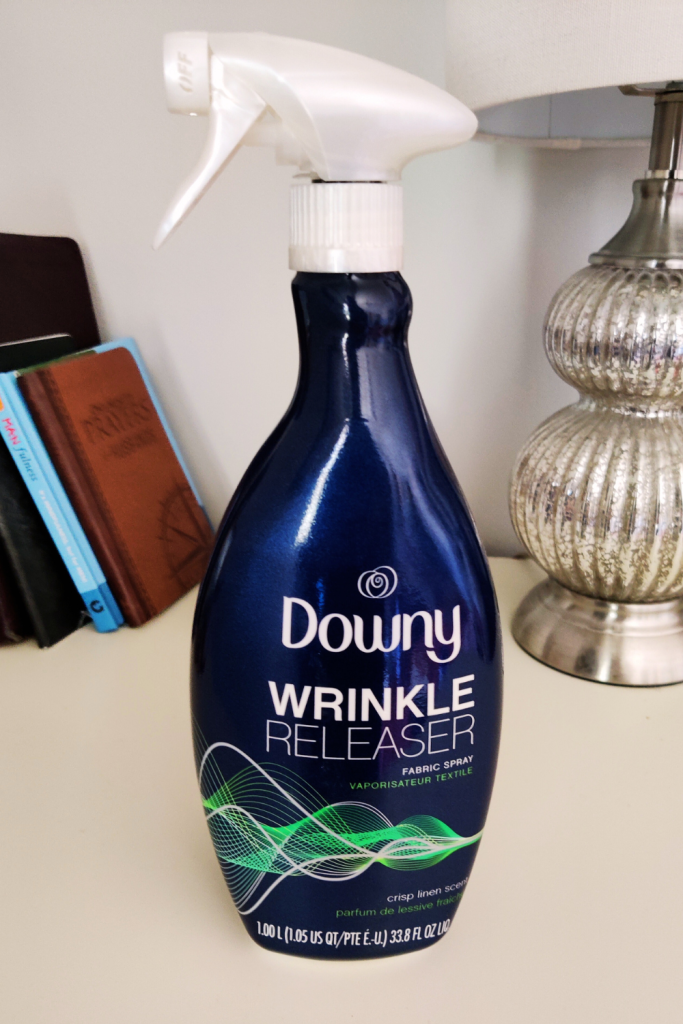
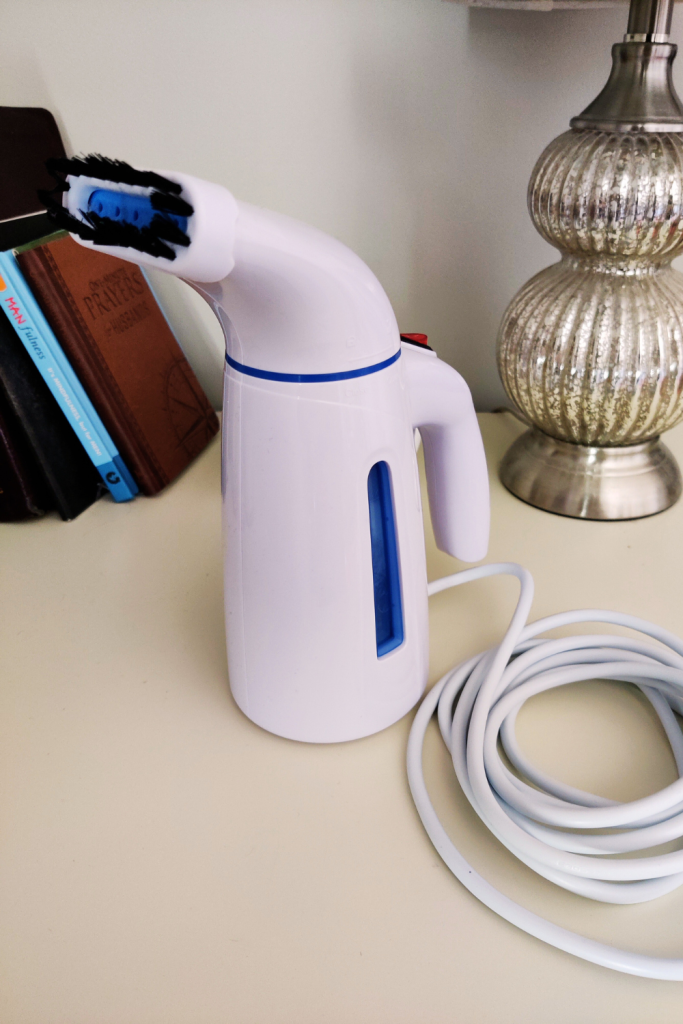
If you’ve still got a few wrinkles, spritz on some Downy Wrinkle Releaser for a cheap, quick fix: https://amzn.to/3DikmkF. If it’s really bad, you can pull out this portable steamer instead: https://amzn.to/41hiAYW. It fills with a water bottle and does a great job smoothing the fabric.
![]() TIP: Consider placing your long-sleeved shirts on a hanger to avoid folding them altogether.
TIP: Consider placing your long-sleeved shirts on a hanger to avoid folding them altogether.
Hangers may be the best option since many long-sleeved shirts fall into the category of “dress shirt” or similar. In that case, you would want to hang them up anyway to avoid wrinkles and creasing.
How To Fold Leggings and Pants
Folding leggings and pants (even shorts) might just be easier than folding shirts. The difference is that you are only folding two legs vs folding two arms, a torso, and a neck.
The trade-off is that pants are generally thicker and use more material than shirts. This makes it harder (impossible?) to fit as many pants in the same space as you would fit shirts.
Nonetheless, we can fold leggings and pants to save space in a similar way we fold shirts.
Here is how to fold leggings and pants, step by step:
(If applicable, button and zip the pants before folding)
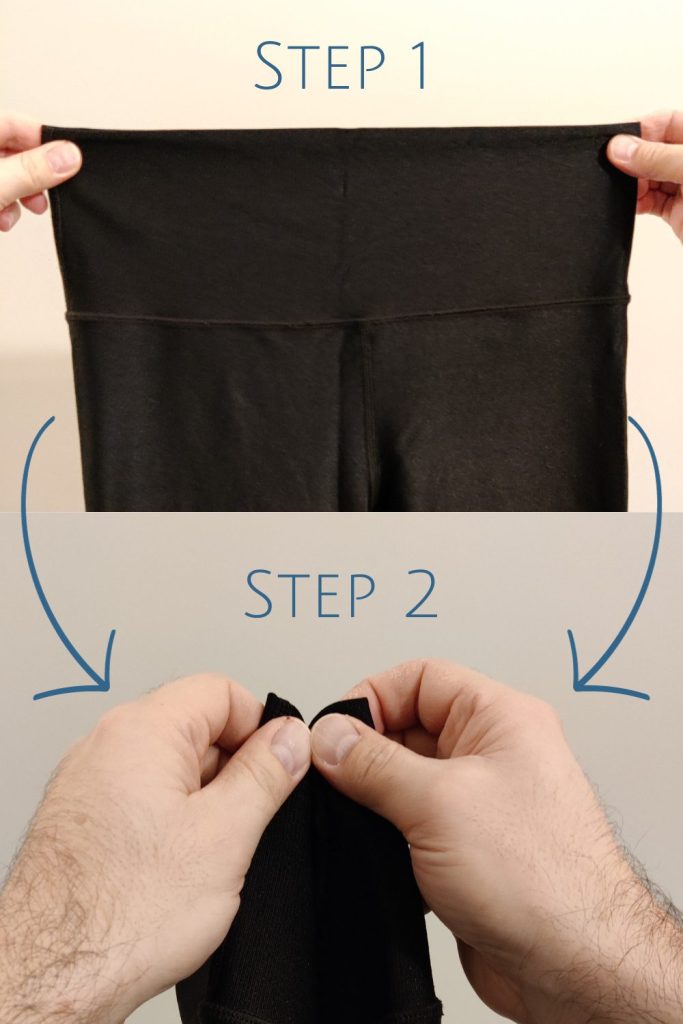

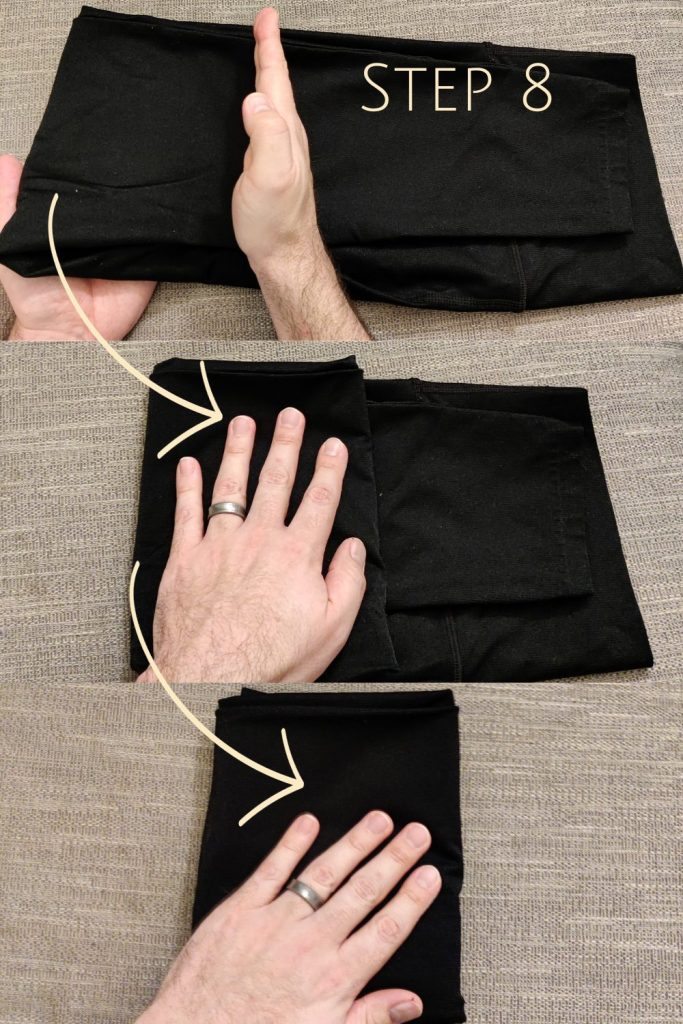
1. Hold the pants at the outermost corners of the top (waist) with the zipper area facing you
2. Still holding the corners, fold the pants in half by bringing the corners together with both hands
3. Still holding the corners together, use one hand to grasp both corners
4. Still holding one corner with one hand, grasp the other corner with the other hand
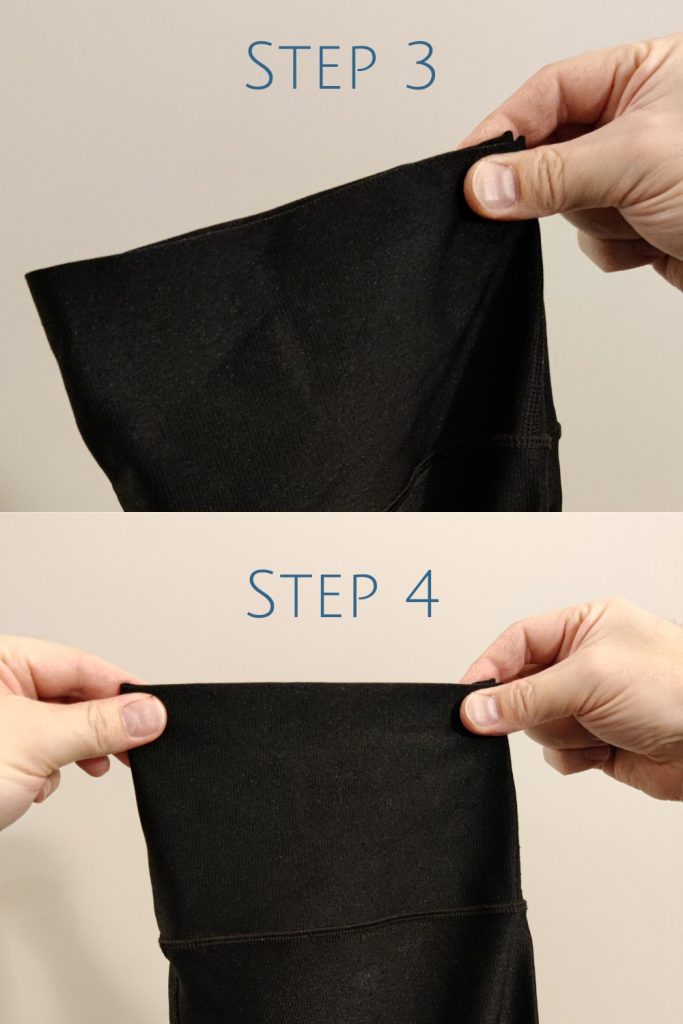
5. Still holding the corners, lay the pants down on the folding surface until they are straight, then let go
6. Fold the point next to the leg inward
7. Fold the pants in half by grabbing the bottom of the folded pants (ankle) and bringing it to the top (waist)
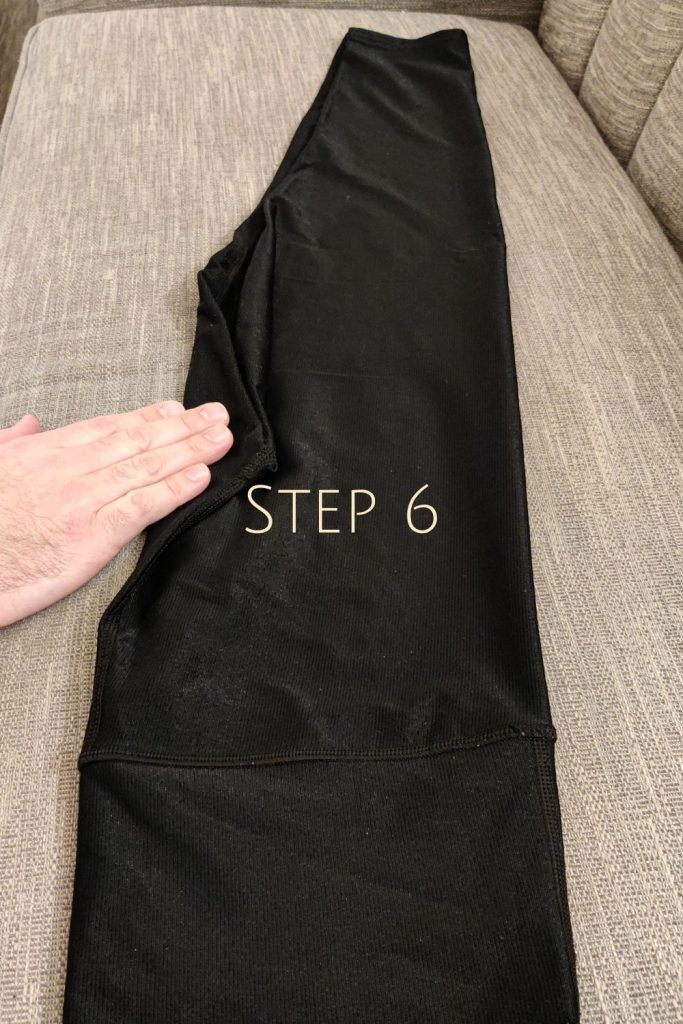
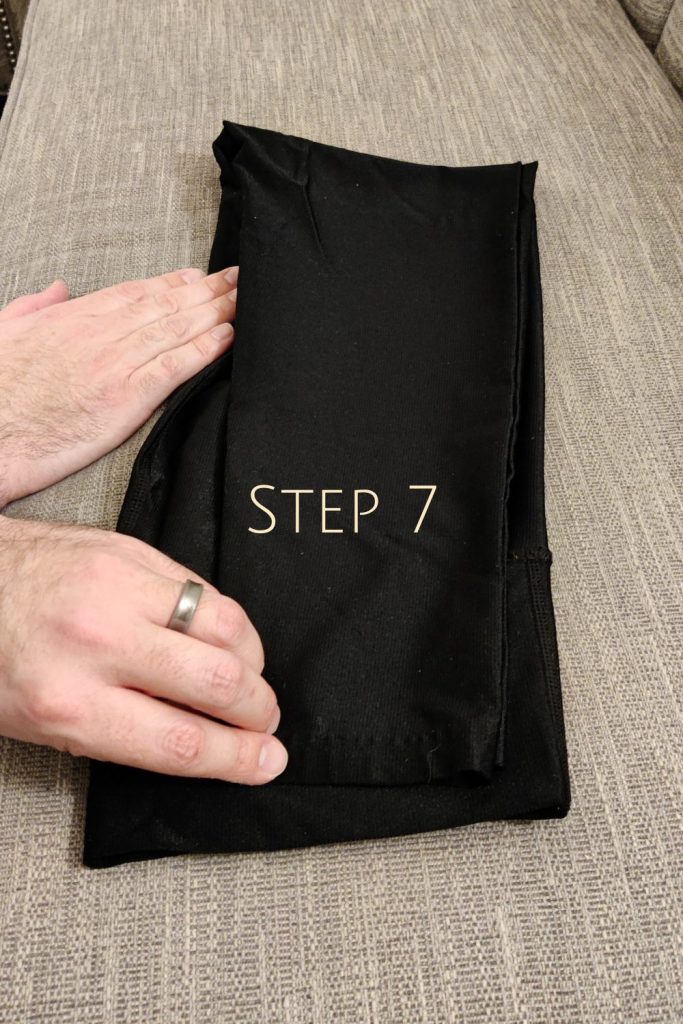
8. Perform steps 9 – 13 of the shirt folding tutorial where the waist of the pants replaces the neck collar of the shirt
Just like folding a shirt, the pants should be able to stand up on end if you do it right.
![]() TIP: This technique applies to leggings, jeans, joggers, and any long-legged pants. To fold shorts, just skip step 7.
TIP: This technique applies to leggings, jeans, joggers, and any long-legged pants. To fold shorts, just skip step 7.
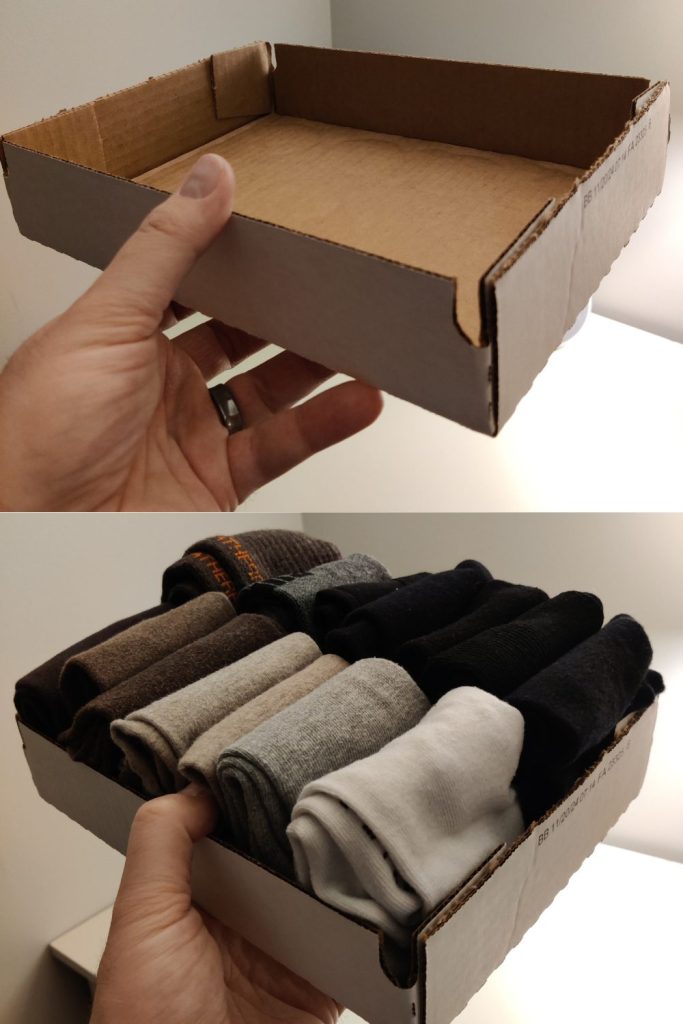
How To Fold Socks To Save Space
Folding socks, underwear, and other small items is super simple and often only requires one fold.
For socks, you may be tempted to roll them into a ball but that is not the optimal shape for space-saving.
Especially when using dividers, it is best to fold pairs of socks in half at least once depending on the length of the socks:
- For low-cut and ankle socks: Fold in half once
- For dress socks: Fold in half twice
- For longer socks (stockings): Fold in half once and then fold in half or in thirds
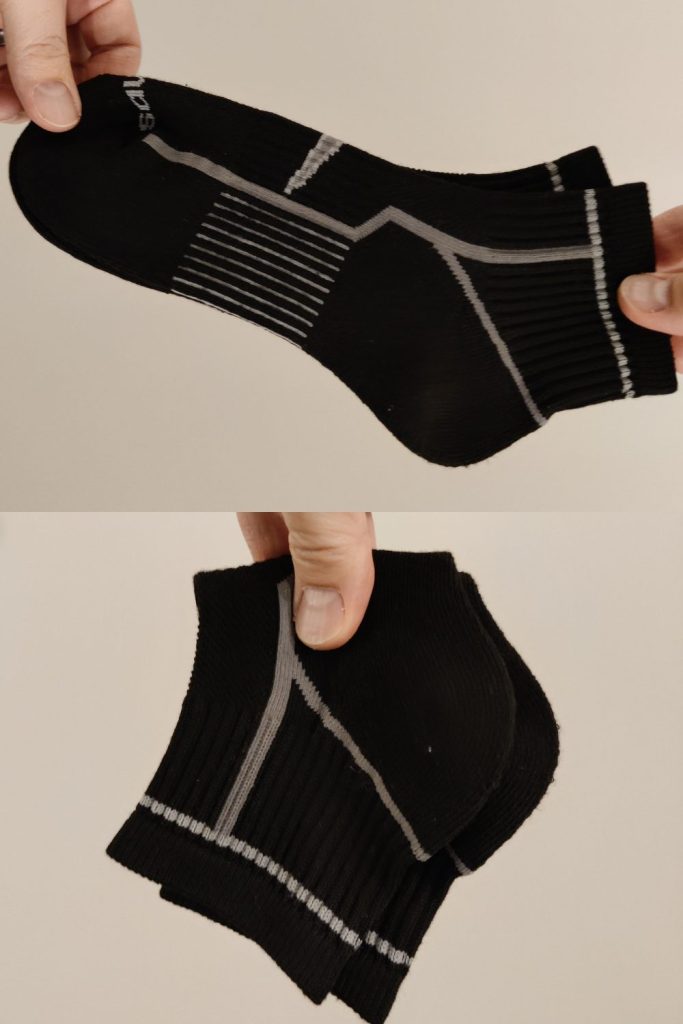
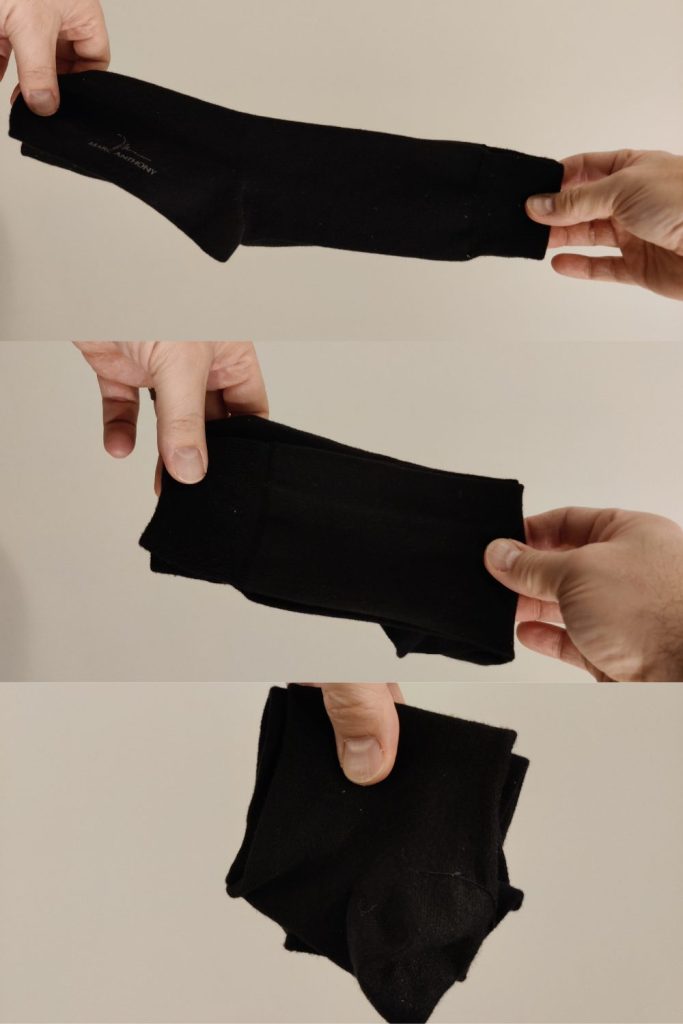
Try to keep the socks long enough to see easily when folded. They may end up getting buried if they are folded too short.
For underwear, it usually takes two folds to make them stand up on end: once along the waist, and one more along the legs.
Folding bras only requires folding in half once due to their shape.
Stand-Up Folding
If you’ve had some practice folding with a flat surface, you may be ready to take the process airborne by using your body instead!
It is not as hard as it sounds and there is not much to it, though you may have to figure out what is comfortable for you.
Instead of laying the item down on a surface, you hold it against your chest, slightly lean back, and continue folding.
![]() TIP: Try holding the top of the item (waist, neck collar, etc.) up to the middle of your collarbone. This should give you enough space to look down at the item when you fold.
TIP: Try holding the top of the item (waist, neck collar, etc.) up to the middle of your collarbone. This should give you enough space to look down at the item when you fold.
It may take some more practice to get proficient at it, but I promise that it will make your folding go much quicker and easier!
Once everything is folded, you can place your newly folded clothes in their respective drawers standing up. You may have to experiment with the direction they are placed (left-right or front-back) to find the optimal space-saving configuration.
I am incredibly confident that if you adopt these folding techniques you will love the result and your home will work much better!


0 Comments